Monday, 26 March 2012

Quirky quilling: give a dog a bow!

Right now, I'm trying to finalise my entries for the North American Quilling Guild's competitions at the forthcoming NAQGCON conference. Obviously, I can't reveal too much about what I am doing at the moment ... suffice to say that I've entered six categories, completed my entries for four of them, struggling with the fifth - and have absolutely no idea what I'm going to do for the sixth, but hopefully inspiration will strike soon! (Entries have to be in by 20th April, so time is steadily ticking!)

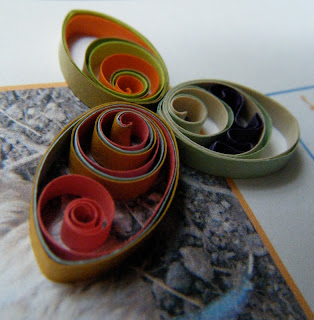
At present, I'm working on a pendant/earrings set for the quilled jewellery category which - as always - seems to be evolving in my head rather than following a plan! I've been experimenting with making heart shapes out of open ring coils (solid rings), and putting filigree patterns inside them. Some of the experiments turned out better than others.  But, you know me - I never like to waste anything! Three of my 'reject' hearts just happened to assemble themselves together in the shape of a ribbon bow, which I decided would look great on a birthday card.


Cards for dog lovers seem to be perennially popular, so I decided to place my 'bow' around the neck of a playful dog that I photographed last year whilst on holiday. This particular dog posed beautifully for me, rolling on his back with a stick in his mouth - but I hadn't managed to use the photograph until now.

Here's a close-up of the bow:


Now, I really must get back to that jewellery ....


Thursday, 22 March 2012

A 'beehive' birthday garland!

Well, here I am back again after a week of meetings, housework, markets and quilling demos! I don't know where the time goes, but at long last I have been able to get back to a little experimental quilling once again.


Today, I decided to make this card featuring a quilled 'garland' formed out of strips that have been twisted using the so-called 'beehive quilling' technique. I worked with 1.5mm strips for maximum delicacy (fiddly, but worth the effort!), and set about introducing some rows of swirls using a fine slotted tool.

For the stem of the garland, I kept the green twisted strip intact - but for the flowers, I snipped the twisted sections off my purple and white strips and glued the little curls at intervals along the stem. This resulted in a rather floppy garland which was obviously going to be difficult to glue, so I strengthened it by folding the stem back on itself in various places and applying glue in a few spots to hold the folded shape together.

I think the garland looks quite pretty as a complement to some elegant printed typography. This technique might also look good when used to decorate a box or picture frame. I can feel some more experiments coming on ...!

Tuesday, 13 March 2012

Production line!!!


There's not been much time for experimentation this past week, because I've suddenly found myself under real pressure to replenish my stock of cards!  I sold 18 cards in the space of two days last week, and my stocks were already running low - so my number one priority right now is to make as many as possible in time for this week's market.

As regular followers will know, I like to print backgrounds for my quilling using photographs or digital graphics, and the first task has been to create a batch of cards ready to quill. I've also turned out a few embossed backgrounds using my Cuttlebug, too. Right now, I'm half-way through adding quilling to this batch.

Here are the ones I've finished so far:

And these are the ones I've still got to do:

The pressure is on!!

The design shown at the top of this post is one that I'm particularly pleased with. It features a 'Photoshopped' photograph of some flowers, filtered to create a 'painting on canvas' effect with drop shadow. I added some 19th Century style quilling, using a trio of open rings pressed into teardrop shapes, with some tiny open filigree inside.

And here's one of the embossed cards, to which I have attached some butterflies and a flower left over from one of my demos. Well, you know what they say:"Waste not, want not"!!

That's all for now ... got to get back to work!


Tuesday, 6 March 2012

Some egg-centric quilling for Easter

Walking around London on Sunday, we kept coming across giant, brightly painted Easter eggs set on plinths at various points along the streets of Covent Garden and the South Bank. Apparently, they are part of an Easter Egg Hunt, and they certainly brightened up a cold, grey day in the city!


This got me thinking about Easter, of course, and the need to create some new Easter cards for the market. As I've been playing around quite a lot with multi-coloured eccentric coils just lately, I decided to make a few more and shape them into crazily-coloured eggs to adorn my favourite photo of a chicken.

I've coiled up a single strand inside some of the eggs, and inserted short lengths of twisted strips into others - just to add to the craziness.

I don't know what my chicken would think of these multi-coloured eggs, but hopefully the customers at our market will like them!


Monday, 5 March 2012

A quilled card for a carpenter


I love getting special orders for cards - but sometimes the requirements are challenging!  The latest request I received was for an 80th birthday card for a man whose main passion in life is carpentry (woodworking). As usual, I decided to work on the digital background first, and came up with a little montage of hammers and saws created using clip art images from Photoshop. While searching for these images, I also noticed a neat little step ladder which I thought might work well as a letter 'A' - so that was the lettering solved!


When it came to the quilling, I opted for a nail and some screw heads, made using metallic strips which I rolled into solid coils. Then all it needed was just a single curly strand of 'wood shaving', created by sequentially twisting a short length of beige 1.5mm strip using a slotted tool. I really hope he likes it!!

Digital quilling

I seem to have had loads of hits on this blog lately from people who are searching for information about digital quilling. For some reason, Google doesn't seem to be directing them automatically to my Coils By Quilliance site - so I am re-posting the link again here.

If you'd like more information about digital quilling, please click on the image below:


LinkWithin

Related Posts with Thumbnails