Inspired by my new friends over at Papers and Pixels, I've decided to have a try at digital scrapbooking ('digiscrapping'). After all, I've been manipulating digital images to use as backgrounds for my quilled cards for many months now, and it feels like a logical step forward.
Here's my first attempt, which utilises a layout template created by Laura Boetto of Maggie May Designs as the vehicle for some of my favourite butterfly photographs. I've called the finished design 'Butterfly heaven', and I'm really pleased with all the bright summery colours - I could certainly do with a break from the gloomy days of winter right now!
However, I certainly don't intend to turn my back on quilling. In fact, I've decided that any digiscrap layout I create in future will contain at least one quilled motif as a signature item. In this piece, I've added a little quilled butterfly in the top right hand corner.
This project has been great fun to do, and I can't wait to experiment further - but I've got plenty more quilling ideas in mind for 2011, too. Who knows what the New Year will bring?
Tuesday, 28 December 2010
Friday, 24 December 2010
Sunday, 19 December 2010
Quilled card for a dog lover
I always feel rather sorry for people whose birthdays fall at this time of year, because their own special celebrations can so easily be overshadowed by the 'main event'. It's our niece's birthday this week, and I've actually found it a real pleasure to sit down and design a quilled card for her which has nothing whatsoever to do with Christmas!
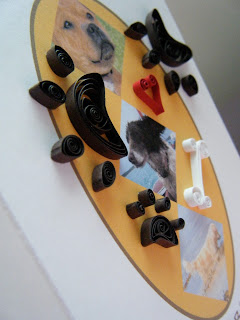
She's a dog-lover, trainer and walker, so I really didn't have to think very long about the theme for this card! All it took were a few doggy pictures, a plain oval background ... and then I could indulge myself with a feast of quilling doggy paws!! The bone and the heart add a bit of extra variety, with colours to lift the overall design. Happy birthday, Tina!
She's a dog-lover, trainer and walker, so I really didn't have to think very long about the theme for this card! All it took were a few doggy pictures, a plain oval background ... and then I could indulge myself with a feast of quilling doggy paws!! The bone and the heart add a bit of extra variety, with colours to lift the overall design. Happy birthday, Tina!
Friday, 17 December 2010
Plenty of news ... but no quilling!
Well, I've just got home from the final village market of 2010 where I sold the last of my Christmas cards. It seems strange to be packing my remaining Christmas stock away before the festivities have even begun, but I'm already looking forward to working on some new craft projects for next year. After all, it's not that many weeks to go until Valentine's Day!
This week has been a very busy one for me, with social events, committee meetings and Christmas shopping taking priority over everything else. So I haven't managed to do any quilling at all since Monday! Unfortunately that means I haven't got any new designs to share with all my loyal blog followers - but I do have a few items of news:
Firstly, my quilling has been featured in the December 2010 edition of Papers and Pixels - an excellent crafting e-zine which was launched online a few months ago. The editorial team has started to include features on quilling alongside informative articles on card-making, photography and digital scrapping - and the editor approached me to ask if she could spotlight me and Quilliance in her 'Blog It!' feature this month. Well, of course I said "yes"! I took part in an interview, and the resulting article was published on Wednesday. You can download the whole December magazine by clicking here. (It's free!) You'll find me on page 73.
Secondly, I have become a member of the UK Quilling Guild, and am looking forward to getting involved in their activities and challenges in the New Year.
And finally, I've managed to obtain a couple of photographs of the special card that my Aunt received from the Queen on her 100th birthday. There was quite a lot of interest in this following my earlier post, and so here are the pictures:
Tuesday, 14 December 2010
You've seen the photo ... now here's the quilling!
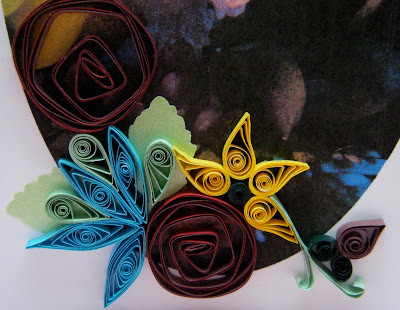
Two flickering candles in the centre of a floral table decoration ... the photo I featured in my last post was crying out to be used in my next card design - and here's the finished result. Using the photo as a background, I've added quilling to try and echo the beauty of some of the flowers that were included in the arrangement: red roses, a yellow lily, blue pom-pom petals and the neat little closed bud of a 'rose of sharon' flower, with fresh green foliage in between.
The roses in the display were particularly stunning, with petals of the deepest red that almost looked like velvet. To quill them, I used a combination of red and burgundy strips joined at one end and folded together in parallel to form an 'art deco' style coil when released.
Here's one of the original roses in all its glory (although the red looks somewhat lighter than reality in this shot):
And here's a close-up of my quilling. The foliage backgrounds were cut from green gift-wrap paper using a leaf-shaped punch.
Sunday, 12 December 2010
Home from the Hundredth!
I'm back home today after travelling to the city of Leicester for the memorable occasion of my Aunt's 100th Birthday party.
It was a great family occasion, giving me the opportunity to catch up with cousins whom I had not seen for many years, plus two new members of the next generation!
The photo I've posted here is an image of a beautiful table decoration from the party which my Aunt kindly insisted that I bring home for my Mother. We had this in the centre of our lunch table, and the melting wax from the candles fused beautifully together during the course of the party. I re-lit them this morning for my Mother, and took the opportunity to get some photos because I can definitely feel a new quilling design coming on!! My plan (as usual) is to use the picture as a background and attach some quilled flowers to echo the colours of the blooms in the flower arrangement. I think it will make a lovely new card design.
At the party, I was happy to see the quilled card that I had made for my Aunt on display alongside all many others she had received. I'm delighted to say she was very pleased with it. However, it paled into insignificance beside the most important card of all: the one that had been sent to her from Buckingham Palace from Her Majesty the Queen. It's a custom here in England for the Queen to send birthday greetings to all those who reach the great age of 100. Unfortunately I didn't manage to get a photo of Her Majesty's card, so I'm afraid I can only offer you a couple more shots of mine!
Tuesday, 7 December 2010
Following yonder star ... quilled!
For the last few days, I've had thoughts in my head about quilling a Christmas star using a dark blue background for the night sky. It was only ever a vague idea, but yesterday I finally had the time to print a background and get started on some quilling. As usual with these projects, I just made up the pattern as I went along!
I have quite a good selection of metallic strips at present, so I decided to use a silver and gold theme for the star. I ended up using three different shades of copper and gold for the 'S' coils. The silver points of the star were made by winding half strips around a thick dowel and pinching the resulting rings into teardrop shapes. I added the white and pale yellow details to 'lift' the colours in the design just a little bit. The two little stars were made using outline peel-offs stuck on to silver paper - I felt that these would put the main star into context as the brightest orb in the night sky.
I'm going to enter this design into the December Challenge on the Creative Quilling Forum. Check out the forum gallery - you'll find some inspiring work on there!
Saturday, 4 December 2010
A classic example
"I love combining quilling with photography to create cards like this one" ... that's the caption you'll find under many of the card designs I've posted on my Flickr page - and there really could not be a better example of what I mean than this.
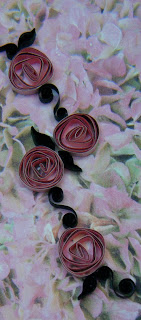
Back in the summer, my friend's husband took this lovely photograph of an opportunist flower poking its pretty head through a gap in their garden fence. The moment I saw it, I could feel a card design coming on, with some quilling to reflect both the colours of the flower and the attractive irregular shapes of its petals.
To make the card, I 'pulled' the photo into a circular border on my computer, scaling it so that the circle is largely filled by the flower, with just a little bit of the fence panel showing through. (There are some nice colours in the panel, too!)
After printing the front of the card, I added my quilled interpretation of the flower - and here's the end result - a classic example of my favourite technique.
Thursday, 2 December 2010
Quilled birthday balloons
After writing about putting quilling on to decoupage newsprint in yesterday's post, I remembered a card design template that I created on the computer a couple of years ago featuring a simple text box with 'birthday-related' words in it. At the time I thought that it might make an interesting background for some quilling, and so I've dusted off the idea once again to create this card for my friend's birthday.
Selected words in the text box are highlighted in colour to brighten up the whole effect, and I've added a bunch of quilled balloons to get the celebrations under way.
This idea could easily be adapted to suit any occasion ... just add quilling! Here's the finished card:
Selected words in the text box are highlighted in colour to brighten up the whole effect, and I've added a bunch of quilled balloons to get the celebrations under way.
This idea could easily be adapted to suit any occasion ... just add quilling! Here's the finished card:
Wednesday, 1 December 2010
How about a little decoupage?
Last night I watched a programme on TV which demonstrated the craft of decoupage. Basically, you just tear up paper into random shapes, and glue the shapes down over-lapping each other, adding a fresh layer of glue as you go. It looked like fun, so I decided to make up a little decoupage background for some Christmas quilling.
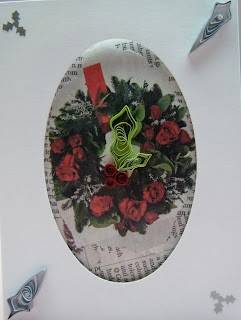
To make this card, I used a card blank with a pre-cut oval cut-out, and layered some torn-up newspaper shapes so that they showed through behind the oval 'window'. The newspaper I chose was a gardening supplement, which included a nice photo of a festive wreath to go in the centre of the design. Then I just added a quilled holly motif after the layering glue had dried, and put a little silver decoration in each corner of the outer card face.
It only took a few minutes to assemble the decoupage, and I'm really quite pleased with the result. Here's what it looks like inside the card:
I think that colourful quilling would look very effective on top of plain black and white newspaper text, too, without needing to find a suitable picture.
By the way, my husband commented this morning that I ought to change the name of my blog from 'Quilliance' to 'Dalliance' because I spend so much time on-line! Cheeky, I know - but I had to laugh!!
Subscribe to:
Comments (Atom)


