Thursday, 29 December 2011

My top ten projects of 2011


It's always fun to look back over past achievements, and fellow blogger Regina Ribeiro has suggested that we all take time out to select our favourite ten projects of the past twelve months. I was actually quite surprised by the number of posts I have managed to make in 2011, but it didn't take me long to select the following for my own 'top ten':


My decorative card featuring a water lily and other quilled flowers, which won a prize at our local village show.

My quilled pin brooch that was selected to represent Hampshire in this year's Women's Institute craft competition.

Another pin brooch created using tri-coloured 'twisted' P coils and metallic edged strips.

Digitally quilled shapes providing a 'ghostly' backdrop  for 'real' quilling.

'It's a shore thing' - my sculpture combining quilling with photography,  real sea shells and vortex coil 'rocks' - won first prize in the 'Quilling Plus' category of the Quilling Guild's Display of Work for 2011.

My spiral starburst on a twisted easel features 'twisted' wheatears and vortex coil blocks, and was awarded The Rose Bowl for innovation at the Quilling Guild's Display of Work for 2011 ... my proudest achievement ever!!

'Rainbow snowflake' - inspired by a piece that was originally created in glass.

My small tortoiseshell butterfly was inspired by an ornamental  flower bed, and is  made from folded roses and fringed flowers.

My own modern 'take' on the Victorian techniques of Mosaicon (a quilling kit sold in England in the 19th Century).

Twists and more twists using the 'beehive' technique.
I would like to thank all my wonderful online friends who have inspired me and left such encouraging comments here on Quilliance over the past twelve months. You really have helped me more than words can say. It's great to be part of such a vibrant and creative international quilling community, which has enriched my life beyond measure - and I'd like to wish every one of you a happy and healthy new year.

Wednesday, 21 December 2011

A kavalcade of Ks!

I haven't got around to entering many challenges lately, so I decided to have a go at the one Pritesh has recently posted on her Quilling Me Softly blog, which is to create a quilled letter 'K".

The trouble is, once I started thinking about possible shapes and styles for the letter K, I couldn't stop! And after producing five very different quilled letters, I found it impossible to choose between them. So I put them all together to form a border decoration, which I can really only describe as a 'kavalcade of Ks'!!


I've decided that 'K' is a shape with lots of potential for borders, as all the letters connect easily with each other and seem to be marching forwards. I hope I won't be disqualified from the challenge for making more than one letter! But, even if I am, it really doesn't matter because my Ks were all such fun to quill!


Monday, 19 December 2011

Life goes on ...

Well, it may be Christmas, but life - and birthdays - still go on exactly as before! I always like to carry a stock of quilled 'age' birthday cards, because customers at our market do occasionally ask for them. I've got designs for ages one through five, 18, 21, 30, 40, 50 etc right up to 100 - these seem to be the main 'milestone' birthdays that people generally want to buy for. Inevitably, I do sometimes get requests along the lines of "Have you got a card for a 42nd birthday - and I need it today?", which, sadly, have to receive a negative response. (If only they had thought to ask me a few days earlier, I could easily have made up a card specially.) Generally, though, I find it's cards for the 'milestone' birthdays that are mostly in demand.

At last Friday's market, I sold the '2nd birthday' card that I'd had in stock for quite some time. Instead of re-making the same design, I decided to try something new - and here's the end result:


It's been a while since I've played around with the blocks of solid colour that I can generate for printing using my Apple Mac Pages software, and it's actually been fun for me to return to them today. I think vibrant blocks of colour can make wonderful backgrounds for quilling. For this card, I've used orange, purple and yellow to create a bright background (carefully avoiding pink or blue as this really needs to work as a 'unisex' design!!) I created some simple gold 'twists' to emphasise the corners of the central '2' using my slotted tool, and then added two quilled balloons and a couple of lime green vortex coils to complete the card.

Hopefully this will be seen as a fun design that might appeal to a young child ... and I'm already thinking about another version with some quilled birthday candles.

Tuesday, 13 December 2011

Doing it digitally

Well, I really seem to have gone from one extreme to the other over the past couple of weeks - from 19th century Mosaicon-style quilling to 21st century digital art (with just a little detour by way of 'beehive' coils in between!)

This week, I felt in the mood to start dabbling with Photoshop again, using the 'virtual' quilling shapes that I developed earlier in the year for my Coils By Quilliance page. When I first created the shapes (in conjunction with an article I was writing for Papers and Pixels magazine), I experimented with using them to create various 'digitally quilled' backgrounds for traditional quilling, which certainly generated some interesting shadowing effects.  I've decided, however, that maybe it's time to start bringing this particular technique a little bit further 'out of the shadows', and explore the potential of digital quilling in its own right.

So, today I created this digitally quilled motif:

Which has found its way on to a new card design here:

I've also played around with creating these designs, which were fun to develop using the various resizing and colouring facilities that you get in Photoshop:


Digitally quilled images like this are certainly easy to reproduce in bulk - all you have to do is print them out!

Clearly, this digital approach will never be able to compete with the depth, texture and sheer versatility of real quilling - but I am beginning to wonder whether digital methods might eventually find a place alongside traditional techniques as our art continues to evolve.

Friday, 9 December 2011

Some more beehive quilling: doing the double!


As I predicted yesterday, 'beehive quilling' is really taking off ... and I couldn't resist having another go myself, with - as you'd expect! - a few Quilliance-style twists thrown in!!

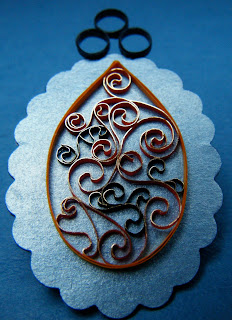
First I made two teardrop shaped open rings and set about filling them with beehive swirls. As you'll see, the swirls are multi-coloured - that's because I worked with long strips made up of several different colours joined together. Once I had packed out the teardrops with my swirls, there were a few gaps that I wanted to fill. So, in each case, I picked a short length of strip to match/complement the adjacent swirl colour, and did some more twisting to make an infill piece - the result is swirls within swirls, or maybe even a double-beehive effect!


I've mounted my teardrops together on a card as you can see here, with a printed blue background panel and two scallop-shaped cut-outs to which the quilling is glued. Two simple 'P' coils join it all together. Fun!!


Thursday, 8 December 2011

A buzz about the beehive!

Thanks to the internet, it doesn't take long for word to spread about new quilling techniques ... and this week the spotlight has been firmly focused on Susan's 'beehive' method for filling in quilled shapes. If you follow this link to her blog, you'll find photos of some brilliant jewellery she has made, plus a link to a very helpful video tutorial that's been recently produced by Pritesh.

The 'beehive method' seems to take the 'scribble technique' a stage further through the creation of a series of closely positioned swirls right along the length of a quilling strip using a slotted tool. The resulting swirls can then be bundled loosely together and dropped into a shaped open ring coil where they then open out to fill it up completely.

I thought I'd have a try at 'the beehive' by creating this new pendant.  However, instead of tightly packing my teardrop-shaped outer ring with swirls, I decided to try leaving a little bit of space around them for the background to show through.

For this piece, I've used a combination of orange and black 1.5mm metallic-edged strips mounted on to a double-ply punched cardstock base that's been topped with pearlised gift wrap. (The strips actually started out as 3mm ones which I cut in half by hand.) I quite like the gilded effect that the strips produce, and I'm pleased with the way the colours work together to create contrasting areas of swirls.

I'm sure that tightly packed swirls also have great potential for use in flower petals, butterfly wings etc, and I've no doubt that many quillers across the world are working on similar projects right now. In fact, I think we'll be hearing a buzz about 'the beehive' for quite some time to come!!


Monday, 5 December 2011

Something quilled and bright for Christmas

I came across an interesting idea on The Quilling Guild's Facebook page last week. Jane Jenkins (yes, THE Jane Jenkins who has published so many inspiring quilling books!) posted some examples of alternate side looped huskings she had made. However, instead of gluing the loops in place, she left them loose and dropped each husking into a ring coil where the loops could release themselves 'at will', resulting in some attractive 'chevron' patterns.

I thought I'd give this a try, but also decided to encourage my husking to unfurl a bit more randomly (following the 'quilled scribble' principle). Then I decorated the end result by putting a few quilled shapes in contrasting colours between the folds.

The result is a crazy Christmas card design which I'm quite sure no-one will ever want to buy, but I enjoyed the process of making it (which is probably all that matters!) I've matted my husking on to a scallop-shaped cut out, then mounted the whole thing on to a printed background. The 'greenery' sprig at the top right was digitally quilled for printing.

Well, at least it brightens up a grey December day ...


Saturday, 3 December 2011

Another new quilled pendant

I'm really getting into the swing of making these pendants on a shaped background ... this one's very different from the others because I've used a black background shape, but I think it looks quite 'dressy' with the silver and gold quilling strips that I used for the motif. Now that I've put the varnish on, it's very shiny too!


I've also been busy making this pendant:

and these leaf-shaped earrings:

I've sold the earrings, but there have been no takers for the pendants yet! Still, there's always next week's market ...

LinkWithin

Related Posts with Thumbnails