It’s FINISHED!!!! The huge quilling project that I’ve been working on for the past 7 months is finally complete! I will not be able to post anything publicly about it for quite a while yet, but at least now I’ll be able to start working on some new ideas and get back to regular blogging once again. Having used up the photo storage allowance here on this blog, I’m very excited to be starting afresh with a brand new one (see below), and can’t wait to resume sharing ideas with all my online friends. It may be a cliche, but today really does feel like the first day of the rest of my life!!
Please visit my new blog Quilliance ... a new chapter via this link: http://quilliance.wordpress.com
I look forward to seeing you there!

Saturday, 5 July 2014
Sunday, 16 March 2014
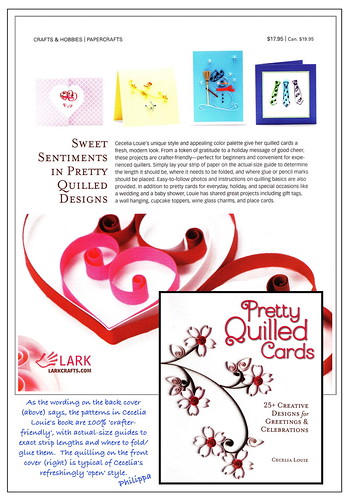
'Pretty Quilled Cards' - a book review
When I first started paper quilling (self-taught, from books), I quickly abandoned my early attempts to create loose and open coils in favour of huskings wound around pins on a board - they seemed so much easier and more reliable to make! Confused by an array of apparently contradictory instructions for rolling coils through slots, around needles and between my fingers, I actually avoided this most basic of quilling techniques for at least six months, before finally resolving to 'tame' those errant coils forever.
The rest, as they say, is history ... but I wish I could have found a book to help me gain a real insight into the behaviour of unruly paper strips right from the beginning.
The introductory section of a new book, by Quilling Guild member Cecelia Louie, would have done the job perfectly. Cecelia's book, entitled 'Pretty Quilled Cards: 25+ Creative Designs for Greetings & Celebrations', is a new addition to Lark Crafts' library of crafting publications, and I was delighted when Cecelia approached me recently to ask if I would review it.
The book has much to offer quillers at all levels, beginners and experienced filigree artists alike. It focuses solely on designs which can be created with loose coils and open scrolls (with just a little fringing and weaving thrown in) - but how versatile these techniques are! Cecelia's work is, by her own admission, very 'loose' and open in style, but this strongly reflects the almost 'graphical' approach to quilling that is currently gaining popularity in the world of commercial art. It looks amazing.
The instructional section is comprehensive, not only explaining clearly how to roll coils both with a slotted tool AND a needle, but also revealing the valuable secrets of how to sculpt paper strips into desired shapes by 'softening', 'rubbing' and 'scraping'. This is all knowledge that I have gained instinctively over the years through a lengthy process of trial and error, but how wonderful it would have been to have had it at my disposal when I was learning! With this book, I'd say you can learn how to 'tame' your strips effectively right from day one.
The projects in Cecelia's book are attractively presented in a ground-breaking way, with actual-size illustrations of every component for each of her designs. Strips can be measured out by laying them along printed guide lengths, which are marked to show the precise locations of necessary folds, cuts and gluing points. Each project is graded to indicate its degree of difficulty, but even those marked at the highest skill levels should be straightforward to accomplish since every element of the design is described and illustrated individually.
I found Cecelia's written instructions to be precise and easy to follow, especially as they are accompanied by consistent cross-referenced step numbers and diagram annotations. I also liked the fact that the book includes various background designs and embellishments which can be photocopied and incorporated directly into card designs.
I learned quite a few things, too - like how to create a complete ring of flower petals from a single strip, simply by 'softening' and creasing. I was also intrigued by the idea of crimping a glued-together bundle of strips while the glue is still wet - the end result looks just like thick icing - and a nifty little trick to create a very authentic looking umbrella handle ... I'm going to have to try that one!
There are many ideas in this book that I will definitely take up and incorporate into my own designs. For anybody just starting out on their own quilling adventure, too, I would say that this is a book which is certain both to empower and inspire, with an impressive range of projects to make and be proud of!
'Pretty Quilled Cards' is now available on Amazon via this link.
Sunday, 9 February 2014
Times have changed!!
I think I'm suffering from blog withdrawal! I always used to post photos of quilling projects that I'd been working on every few days ... but how things have changed! Right now I'm working on several major pieces of quilled artwork which I have to keep secretly 'under wraps' for the foreseeable future - and they are going to take me most of this year to complete! I'm so excited about these projects, but I cannot share them yet. So, personal blogging - which has been an integral part of my life for the past few years - is going to have to stay 'on hold'.
Meanwhile, it's no secret that I'm currently also engaged in publishing The Quilling Guild's members-only blog and editing Quillers Today, the Guild's high-profile 32-page members' magazine which is published three times a year. For me, stepping into the Editor's role has been a real privilege. It puts me closely in touch with Guild members across five continents, and requires me to keep my finger firmly on the pulse of all the latest developments in the world of Quilling. I am learning so much ... and it gives me great satisfaction to be able to share each new discovery with our readers. I can honestly say that, having retired from my full-time career in marketing a few years ago, this new role as an Editor is definitely the best job I 'never' had!!
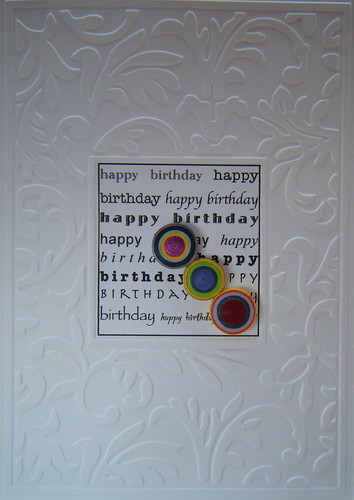
So, please forgive me if my posts here are a little sparse over the next few months. Happily, though, I've just received a request from my local gallery to produce a fresh stock of quilled cards for them to sell, and the latest of these designs is shown in the the photo above. It's great to get back to card-making again, if only for a short time. You haven't heard the last of me just yet!!
Meanwhile, it's no secret that I'm currently also engaged in publishing The Quilling Guild's members-only blog and editing Quillers Today, the Guild's high-profile 32-page members' magazine which is published three times a year. For me, stepping into the Editor's role has been a real privilege. It puts me closely in touch with Guild members across five continents, and requires me to keep my finger firmly on the pulse of all the latest developments in the world of Quilling. I am learning so much ... and it gives me great satisfaction to be able to share each new discovery with our readers. I can honestly say that, having retired from my full-time career in marketing a few years ago, this new role as an Editor is definitely the best job I 'never' had!!
So, please forgive me if my posts here are a little sparse over the next few months. Happily, though, I've just received a request from my local gallery to produce a fresh stock of quilled cards for them to sell, and the latest of these designs is shown in the the photo above. It's great to get back to card-making again, if only for a short time. You haven't heard the last of me just yet!!
Monday, 18 November 2013
A new pendant design
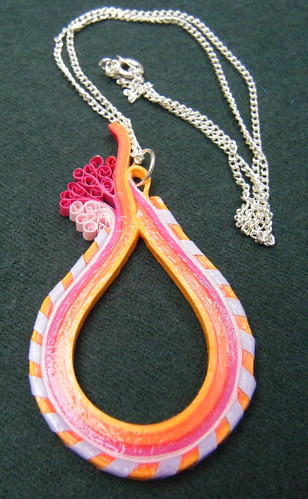
There's been a lot of dialogue on the Quilling Guild's Facebook Group page recently about 'bandaging' - an antique quilling technique whereby a paper strip is wrapped diagonally around a bundle or 'wad' of multiple quilling strips.
This got me thinking ... and so I started experimenting to see whether I could form shapes from wide bundles of quilling strips cut from a multi-coloured pack that I happened to have in my 'stash' of materials.
This brightly coloured pendant is the result! It's made in two sections: the inner part is formed from a multiple wad of strips from the pack, while a separate narrower 'bandaged' bundle has been added as a border decoration for the outside of the piece.
When creating the inner section, I had fun twisting the ends of a few of the strip ends that I had decided not to glue down, in order to add a little more interest to the overall shape.
It took quite a lot of gluing to hold the individual strips in the main 'wad' together - and the use of self-closing tweezers certainly helped this task! I also retained the manufacturer's binding from one end of the pack of strips in place until I had finished gluing, after which it was quite easy to peel away.
I coated the whole piece with a thin layer of PVA glue and clear varnish to make it strong and waterproof. That's why it appears quite shiny when photographed under natural light.
I think it's an unusual piece, for sure, but I quite like the way the graduated colours from the pack of strips have worked together. I also like the visual effect of the bandaging around the edge, so will definitely be experimenting with this technique a little more!
Thursday, 10 October 2013
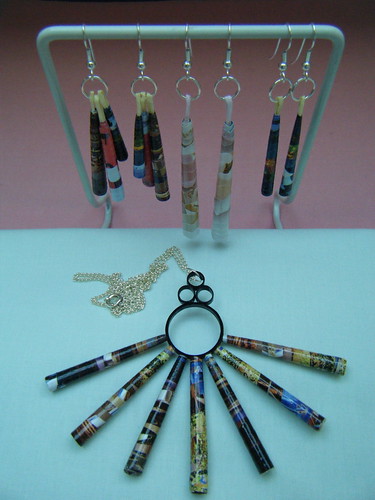
Upcycled paper bead jewellery
Inspired by the renowned Australian quiller Licia Politis and her wonderful paper beads, I've had a go at creating some jewellery using colourful paper sourced from glossy magazine pages.
Licia kindly shared with me the method of rolling up long triangular strips of paper to form a conical shape, and I had fun selecting suitable paper by looking out for full-page photographs and colourful advertisements in some larger than average size travel magazines.
You need quite a long strip of paper to make a decent-sized bead - the ones I used were all about 35 cm long. The method involves rolling the strip into a coil, fastening the end with glue and then pushing the middle out to form a sort of telescopic cone, which can then be strengthened using layers of PVA glue and clear varnish.
I managed to create hanging hooks for my earrings using loops of paper twine which I glued on to the wide end of each strip prior to rolling.
With Licia's help, I'm plannng to write a detailed feature about paper bead making for the Spring 2014 edition of the Quilling Guild's 'Quillers Today' magazine, of which I am now Editor. No doubt I'll be experimenting with plenty more designs along the way!
Thursday, 3 October 2013
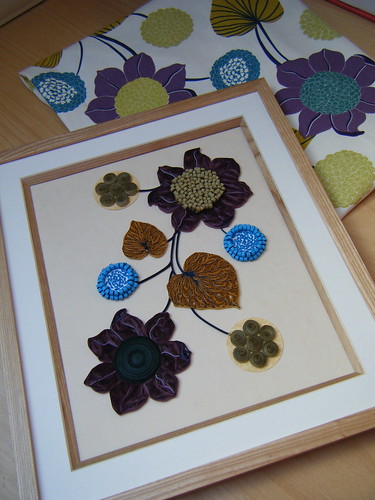
Quilled picture for Enid
Enid recently made some new curtains for her bedroom using a very attractive fabric that is boldly printed with leaves and flowers. We decided that the pattern would be eminently 'quillable' ... so she asked me to create a complementary quilled picture for the bedroom wall.
I took a piece of left-over fabric, scanned the individual elements of the pattern and re-arranged them on the computer using Photoshop to create a layout that I could quill.
For the large flowers, I made two different types of centre: one is a slightly domed solid coil in dark green, and the other is a punched-out disc of paper covered with teardrop shapes that have been glued in position on their edges. The petals are made using vortex coils, moulded into shape, with thin 'veins' of contrasting colours glued along their inner sides.
For the blue flowers, I made large white solid coils, covered them in tiny 'squished' coil crescent shapes in blue, then edged the solid coils with two layers of on-edge blue teardrops.
The greeny yellow globe flowers were made using punched discs of paper covered in crimped strip solid coils.
The golden leaves are made up from eye shapes, with contrasting strips glued along their inner edges to create veins.
The interlinking stems are cut from solidly glued ring coils moulded around shampoo bottles and other objects that produced the required degrees of curve.
I assembled all the pieces separately, using pins on a piece of clingfilm-covered mounting board. Then the whole piece was assembled on a 12" x 10" backing sheet to fit within the recessed frame.
I'm very pleased to report that Enid loved it!!
Friday, 13 September 2013
It started with a jar of jam ...
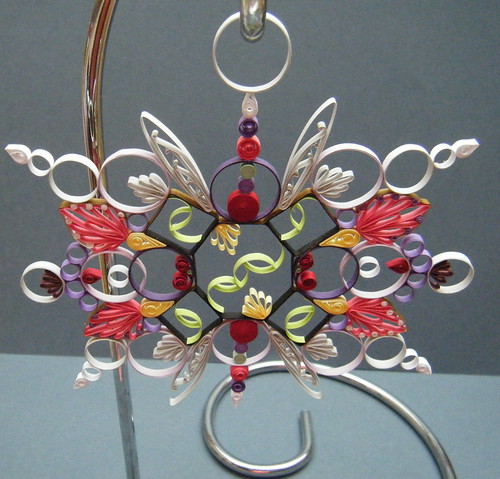
Here's another of the items that I displayed at the Quilling Guild's 30th Anniversary Celebration of Quilling in Liverpool last month ... and, yes, it really did start with a jar of jam!
During a short break to Wales earlier in the summer, my husband and I visited the lovely tea room at Picton Castle where we indulged in a classic British afternoon snack: tea and toasted tea-cakes! The tea-cakes came with tiny individual pots of strawberry jam which I noticed were octagonal in shape. So I brought one home and used it as a mould for the black octagonal ring coil that forms the centre of this design.
I wanted to create a colourful quilled wall-hanging, so I added more rings, huskings and other quilled shapes on to the sides of the octagon, building the whole piece outwards from the middle ... and, needless to say, making it all up as I went along!
The green semi-circles inside the central octagon were created by making solidly glued ring coils around a dowel and cutting them in half. I made other whole ring coils for the piece using various sizes of dowel, and had fun filling them up with decorative huskings, 'twisted' wheatears and other quilled shapes. I assembled the whole piece on a cling-film covered board with a visible grid pattern under the film to assist in maintaining symmetry, securing the sections with the aid of pins.
The finished design is displayed in this photo hanging from a convenient metal stand which is actually intended to carry a bunch of bananas suspended alongside your fruit bowl at home!
The moral of this story is: always watch out for the everyday shapes that come into your life and think about how they could be used in quilling! I certainly treasure the little octagonal jam jar that provided the creative spark for this particular piece!
Subscribe to:
Posts (Atom)