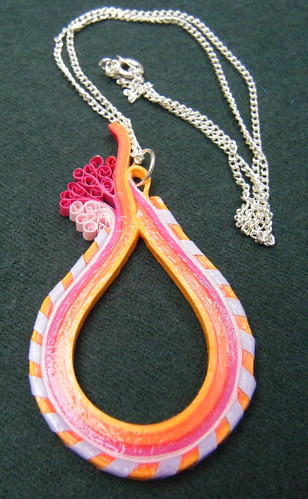
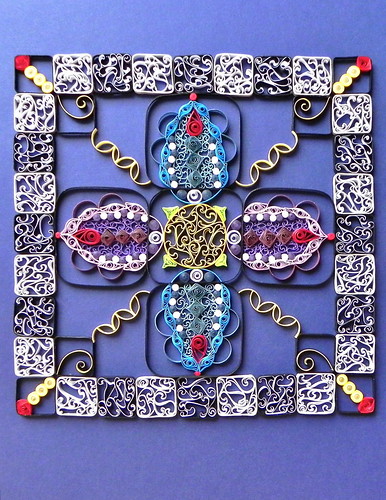
There's been a lot of dialogue on the Quilling Guild's Facebook Group page recently about 'bandaging' - an antique quilling technique whereby a paper strip is wrapped diagonally around a bundle or 'wad' of multiple quilling strips.
This got me thinking ... and so I started experimenting to see whether I could form shapes from wide bundles of quilling strips cut from a multi-coloured pack that I happened to have in my 'stash' of materials.
This brightly coloured pendant is the result! It's made in two sections: the inner part is formed from a multiple wad of strips from the pack, while a separate narrower 'bandaged' bundle has been added as a border decoration for the outside of the piece.
When creating the inner section, I had fun twisting the ends of a few of the strip ends that I had decided not to glue down, in order to add a little more interest to the overall shape.
It took quite a lot of gluing to hold the individual strips in the main 'wad' together - and the use of self-closing tweezers certainly helped this task! I also retained the manufacturer's binding from one end of the pack of strips in place until I had finished gluing, after which it was quite easy to peel away.
I coated the whole piece with a thin layer of PVA glue and clear varnish to make it strong and waterproof. That's why it appears quite shiny when photographed under natural light.
I think it's an unusual piece, for sure, but I quite like the way the graduated colours from the pack of strips have worked together. I also like the visual effect of the bandaging around the edge, so will definitely be experimenting with this technique a little more!

Monday 18 November 2013
A new pendant design
Thursday 10 October 2013
Upcycled paper bead jewellery
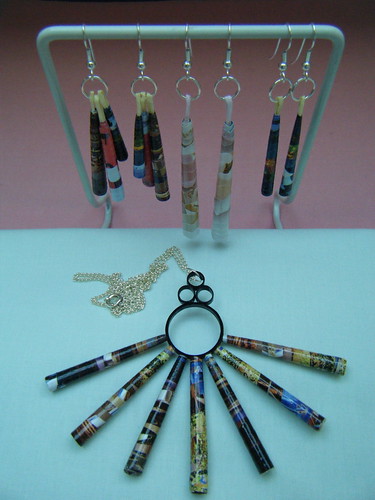
Licia kindly shared with me the method of rolling up long triangular strips of paper to form a conical shape, and I had fun selecting suitable paper by looking out for full-page photographs and colourful advertisements in some larger than average size travel magazines.
You need quite a long strip of paper to make a decent-sized bead - the ones I used were all about 35 cm long. The method involves rolling the strip into a coil, fastening the end with glue and then pushing the middle out to form a sort of telescopic cone, which can then be strengthened using layers of PVA glue and clear varnish.
I managed to create hanging hooks for my earrings using loops of paper twine which I glued on to the wide end of each strip prior to rolling.
With Licia's help, I'm plannng to write a detailed feature about paper bead making for the Spring 2014 edition of the Quilling Guild's 'Quillers Today' magazine, of which I am now Editor. No doubt I'll be experimenting with plenty more designs along the way!
Thursday 3 October 2013
Quilled picture for Enid
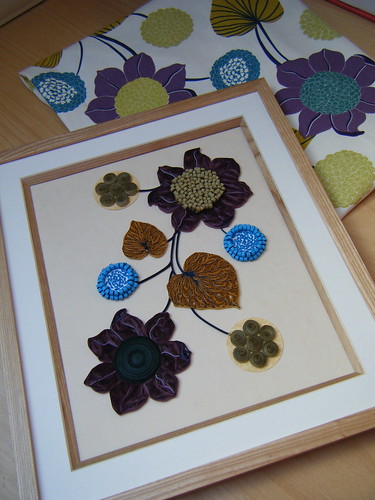
I took a piece of left-over fabric, scanned the individual elements of the pattern and re-arranged them on the computer using Photoshop to create a layout that I could quill.
For the large flowers, I made two different types of centre: one is a slightly domed solid coil in dark green, and the other is a punched-out disc of paper covered with teardrop shapes that have been glued in position on their edges. The petals are made using vortex coils, moulded into shape, with thin 'veins' of contrasting colours glued along their inner sides.
For the blue flowers, I made large white solid coils, covered them in tiny 'squished' coil crescent shapes in blue, then edged the solid coils with two layers of on-edge blue teardrops.
The greeny yellow globe flowers were made using punched discs of paper covered in crimped strip solid coils.
The golden leaves are made up from eye shapes, with contrasting strips glued along their inner edges to create veins.
The interlinking stems are cut from solidly glued ring coils moulded around shampoo bottles and other objects that produced the required degrees of curve.
I assembled all the pieces separately, using pins on a piece of clingfilm-covered mounting board. Then the whole piece was assembled on a 12" x 10" backing sheet to fit within the recessed frame.
I'm very pleased to report that Enid loved it!!
Friday 13 September 2013
It started with a jar of jam ...
Here's another of the items that I displayed at the Quilling Guild's 30th Anniversary Celebration of Quilling in Liverpool last month ... and, yes, it really did start with a jar of jam!
During a short break to Wales earlier in the summer, my husband and I visited the lovely tea room at Picton Castle where we indulged in a classic British afternoon snack: tea and toasted tea-cakes! The tea-cakes came with tiny individual pots of strawberry jam which I noticed were octagonal in shape. So I brought one home and used it as a mould for the black octagonal ring coil that forms the centre of this design.
I wanted to create a colourful quilled wall-hanging, so I added more rings, huskings and other quilled shapes on to the sides of the octagon, building the whole piece outwards from the middle ... and, needless to say, making it all up as I went along!
The green semi-circles inside the central octagon were created by making solidly glued ring coils around a dowel and cutting them in half. I made other whole ring coils for the piece using various sizes of dowel, and had fun filling them up with decorative huskings, 'twisted' wheatears and other quilled shapes. I assembled the whole piece on a cling-film covered board with a visible grid pattern under the film to assist in maintaining symmetry, securing the sections with the aid of pins.
The finished design is displayed in this photo hanging from a convenient metal stand which is actually intended to carry a bunch of bananas suspended alongside your fruit bowl at home!
The moral of this story is: always watch out for the everyday shapes that come into your life and think about how they could be used in quilling! I certainly treasure the little octagonal jam jar that provided the creative spark for this particular piece!
Wednesday 21 August 2013
A quilled mosaic
Here's the second of my two competition entries for the Quilling Guild's 30th Anniversary Celebration of Quilling in Liverpool, 10 - 11 August 2013. This time it's an abstract quilled mosaic, framed by squares containing two-tone 'beehive' swirls in black/white and grey/white. Inside the border are more composite shapes set within larger square 'ring coils' that I formed around the plastic box lid that came with my husband's iPod!
The whole design is basically 'tiles within a tile'.
You will see various solid coils and vortex coils throughout the design, plus rows of yellow half circles cut from ring coils, which I have positioned together to form a lattice.
Quilled mosaics are very much on my mind right now, as I think that square 'tile' building blocks like the ones I have used here could easily form the basis for many different quilled creations. This could definitely be the start of something ...
Tuesday 13 August 2013
Quilled rainbow spiral
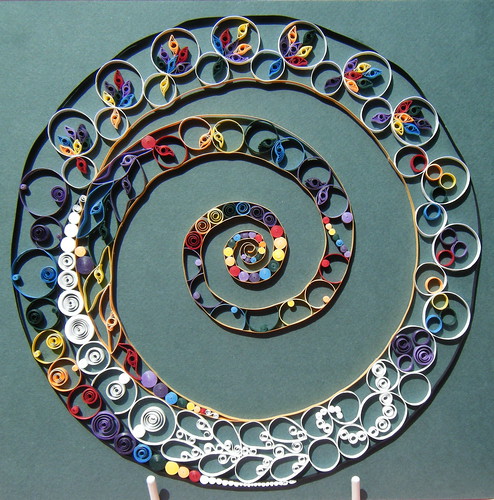
Those of you who have followed me for a while will know that I have a bit of an obsession with spirals. Well, here's my latest one, which I took to the Quilling Guild's 30th Anniversary Celebration of Quilling in Liverpool, UK, on 10 - 11 August 2013.
I used a combination of ring coils, cut ring coils, solid coils and various filigree shapes to create this piece, which was constructed under cling-film over a tracing of the spiral using pins on a mounting board.
The rainbow colours were carefully inserted in sequence, complemented by the inclusion of black and white sections.
To make the spiral outline, I used conjoined strips which I had pre-conditioned to make them curl. The main challenge was 'taming' the curl of the outline strips in order to follow the spiral accurately all the way round.
I'm proud of this piece, as it expresses the deep affinity with spirals and sea-shell patterns that I seem to have within me!
I hope you like it too!
Wednesday 7 August 2013
Where are you now?

To avoid the expense and hassle of having the piece returned to me here in the UK, I donated it to the NAQGCON raffle at the end of the event, so I have no idea who won it ... I wonder where my little quilled floral sculpture is now?
My piece did not win an award, but that's fine - the quilling that received all the votes in the category is beautiful, and a very worthy winner! But, to be honest, I am DEEPLY disappointed that it has taken three whole months until the publication of Quill America magazine to find out the results of the competitions. I can hardly believe that it has taken all this time to find out how I fared!
Never mind, though - things are going to be very different at the UK-based Quilling Guild's 30th Anniversary Celebration of Quilling in Liverpool this weekend! Technology permitting, we are planning to publish 'live' news and photos from this exciting international quilling festival on the Quilling Guild Facebook Group page throughout the course of the event, so that an eager audience of quillers across the world can share in the excitement of this very special celebration.
If you're on Facebook, simply sign in via this link to see it: https://www.facebook.com/groups/152384868122961/
Liverpool, here I come ... I can hardly wait!!
Monday 22 July 2013
Daisy chain!
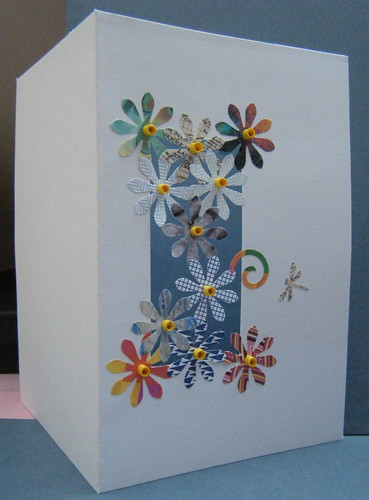
The idea of creating a lattice of punched shapes over an aperture cut in the front of a card was shared at a craft workshop that I attended last week ... and I just had to have a go!
I cut a rectangular aperture in the front of this card, and then used a daisy-shaped punch to cut an array of flowers out of variously patterned papers. Some of the daisies are punched from the blue/white security patterns that you find printed on the inside of business envelopes; the rest are from colourful patterns that I have printed out using my extensive collection of digital images! I'm sure that any pre-printed patterned paper would work equally well.
By gluing one flower on to the the card at each corner of the aperture, and then attaching others across the open space using tiny dots of glue at the adjoining tips of their petals, I was able to create a colourful lattice effect of my own. As you can see, I also added a punched-out swirl and tiny dragonfly on the face of the card for good measure!
The centres of the flowers were made by quilling closed loose coils using inch-long (25mm) strips of 3mm wide yellow paper, which I glued on to each daisy. Somehow, the addition of these really brought the whole design to life!
I'm pleased with this card, even though there isn't much quilling in it. All the different colours seem to create a lovely summery effect, reflecting the wonderful weather we're enjoying here in the UK right now. Long may it last!!
Monday 8 July 2013
Front page news!
Janet and I will be receiving our Accreditation Certificates at the Quilling Guild's forthcoming 30th anniversary celebration of quilling in Liverpool next month, where our work will also be on display ... I'm so looking forward to the event!
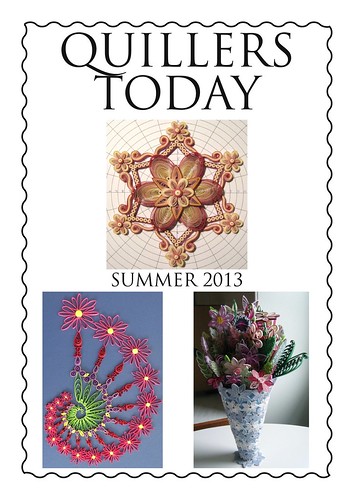
If that weren't exciting enough, I have now been officially appointed Editor of Quillers Today magazine with effect from the Autumn 2013 edition. I can't wait to get started on creating this special issue which will report fully on all the wonderful displays, competition entries, workshops and shared ideas that will make the Liverpool event so special.
I'm also planning to post 'live' news updates from Liverpool on the Quilling Guild's Facebook Group page throughout the weekend, which I'm hoping will be an exciting new development for the online quilling world.
To find out more about the Quilling Guild, our magazine, our exclusive members' blog and the Liverpool festival, please visit the Guild's website at: www.quilling-guild.co.uk - and hold on to your hats! This is going to be an UNFORGETTABLE Summer of quilling!!
Sunday 19 May 2013
Thank you
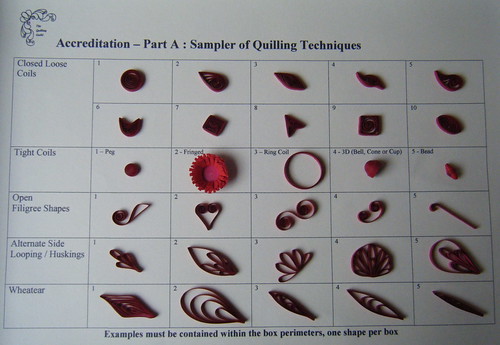
The quilled spiral that I featured in my last post was, of course, only part of the work submitted to the Guild for assessment ... I also had to complete a sampler of quilling shapes, as pictured above. Doing this really helped me to sharpen up my quilling technique as you have to focus on getting every single piece absolutely perfect - and I’m convinced that I’m now a better quiller as a result. So, my message to Quilling Guild members is: do consider applying for Accreditation - it really is a worthwhile process. When you succeed, you genuinely feel as though you are contributing to the continuing evolution of our historic Art.
You can read all about the Accreditation process on the Quilling Guild’s website here.
As a final postscript to this story, I was delighted to discover that my Accreditation piece (the spiral) had actually been featured last week on the BuzzFeed online newsletter alongside many other wonderful examples of modern quilling (including the work of Yulia Brodskaya!!). Have a look at the BuzzFeed link here to see their feature called ‘Quilling: the best craft you’ve never heard of’ ... and prepare to be amazed!
Monday 13 May 2013
Success!
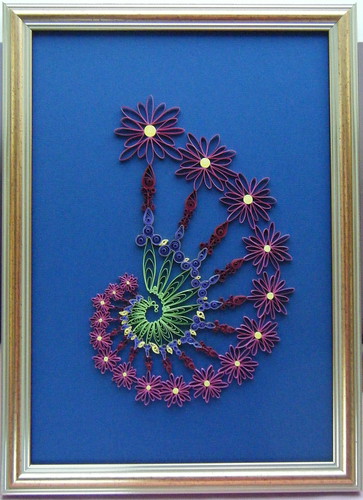
The Guild’s prestigious Accreditation Scheme is described in detail on the organisation’s website here, and involves the submission of a ‘sampler’ of all the officially recognised quilling shapes plus an original piece of work to demonstrate the applicant’s skill. Mine is pictured above.
The idea for this piece sprang from my fascination with the spiral patterns of sea shells, and was initially inspired by the design concept of a pattern which was originally created digitally by Irene Thompson in Photoshop (http://www.photoshoproadmap.com/Photoshop-blog/create-fractals-photoshop/).
I began work on the piece by re-designing and translating the elements of the spiral pattern into a combination of the required quilling shapes to meet the Accreditation criteria, ensuring that sufficient gluing anchor points were created to hold it all together!
I traced the basic outline of the spiral to delineate the outline of each ‘whorl’ of quilled shapes, and then made two photocopies of the tracing which I mounted beneath cling-film on to two separate blocks of mounting board (into which pins could easily be inserted). The first board was used to create each individual quilled shape to the exact required size. The second board was used to assemble the finished quilling.
When placing the anchor pins for each wheatear and alternate side looped piece, it was important to allow for the thickness of mutliple ‘windings’ of the quilling strip, so that the pieces did not exceed the overall dimensions of the whorl boundaries.
I started by quilling the largest section of the spiral, building up the pattern like individual spokes of a wheel. Making the pieces became progressively more difficult as the pattern became smaller, and it was necessary to modify/simplify some of the basic shapes as they reduced in size. When making the smallest pink flowers, it was necessary to abandon pins and create the huskings in my fingers, sizing them by eye.
The complete assembled piece was lifted gently off the cling-film covered board and attached to the blue backing paper by applying glue to the backs of the solid coils, yellow spacing shapes and the inner edge of the spiral. This selective gluing was sufficient to hold the spiral in place, minimising the risk of glue marks on the backing paper which the Guild Assessors always look out for!
To say that I am delighted with the achievement of my Quilling Guild Accreditation would be an understatement. Now, at last, I can relax and look forward to the presentation of my Accreditation Certificate at the Quilling Guild’s forthcoming 30th Anniversary Celebration of Quilling event which is going to be held in Liverpool, UK on 10th - 11th August 2013.
Monday 4 March 2013
Times are changing ...
I haven't posted to Quilliance since January ... but that certainly doesn't mean I've been idle!
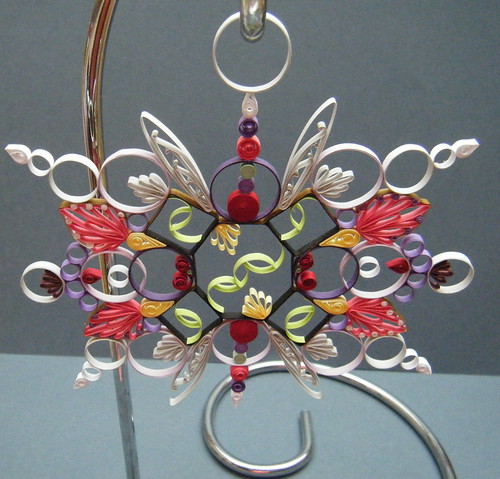
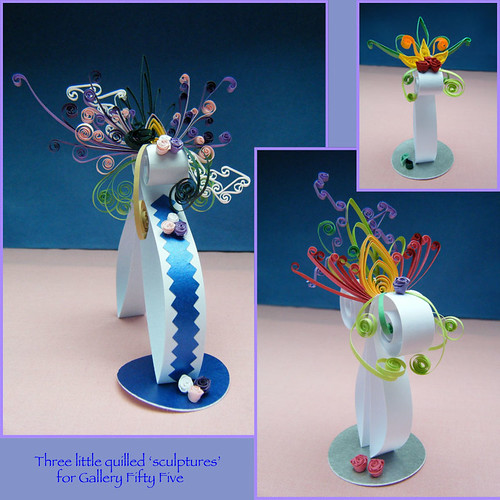
I'm still quilling avidly, creating things like the embossed frame cards that I featured in my last post; these little quilled 'sculptures' (see above) which I'm proud to say are now on sale in my local Gallery; plus competition entries for the upcoming Quilling Guild 30th Anniversary Celebration of Quilling which is going to be held in Liverpool, UK, on 10 - 11 August 2013. (You might like to check out the Guild's website at www.quilling-guild.co.uk for more details of this unmissable event.)
More than that, however, my involvement with the Guild is taking up increasing amounts of my time - and I'm loving every minute of it! The special Blog which I am now writing exclusively for Guild members has proved to be a great success ... and it now looks as though I'm going to be taking over as Editor of the Guild's highly-acclaimed members' newsletter, 'Quillers Today', with effect from Autumn 2013. So these really are exceptionally exciting times for me. I may not be posting to my own blog so often in future, but I'm still very much involved in online activity via Facebook, Quilling Cafe and other quilling sites. I hope to see you there!
Philippa
Wednesday 9 January 2013
Embossing, quilling and background papers
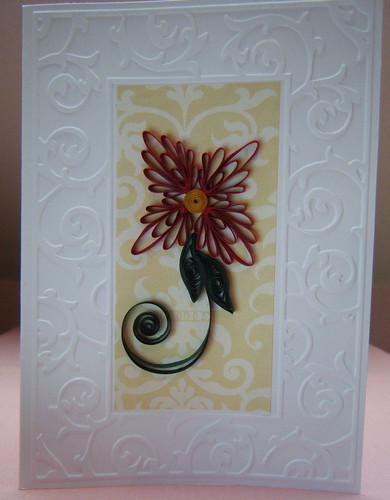
My Cuttlebug machine has been working overtime these past few days, creating embossed frames for some more new card designs.
The embossing folders I use have a blank panel in the centre which is perfect for adding a splash of colour in the form of a printed background paper and some quilling.
Somehow the white textured 'frame' sets off the coloured centre very well, I think - especially when the pattern is 'echoed' by the background print. I'm having fun with these!!
Tuesday 1 January 2013
New year ... new cards!

Well, I'm finally back to making a few cards again after quite a long time spent doing other things (one of which has been launching the Quilling Guild's new blog - such an exciting new development!).
I have always liked the 'framing' effect that embossing brings to a design, and for these cards I used one of my Cuttlebug folders which features an attractive profusion of swirls set around a plain rectangular space in the middle.
I wanted a bold, bright centre for these designs, so decided to glue a piece of coloured card to the centre of each. Then it was 'just' a case of adding some quilling!
The design on the left features a crazy combination of vortex coils, a 'twisted' wheatear, 'beehive' work and closed loose coils ... a bit 'off the wall' in classic Quilliance style, but I like it!
The central card is a bit more conventional, incorporating gold-edged strips to go around the purple shapes in the middle section of the motif.
The right-hand card is another 'crazy' one, featuring two-tone beehive twists inside an asymmetrical ring of vortex coil diamonds.
It's great to be back making cards like these - they give me such a great opportunity to experiment.
Happy New Year everyone!!