Wednesday 28 September 2011

Just look what I found in Photoshop!

If you are a regular follower of Quilliance, you may remember that I did some quilling last year inspired by the style of the 19th century English artist William Morris.  I love the bold, swirly, leafy designs that Morris produced, so you can imagine my excitement when I came across some very similar ornamental patterns in the 'Shapes' menu of Photoshop Elements (version 9):

Using the Photoshop software, I combined the square motif I had found with some zig zag lines on-screen, reduced the opacity of the image to make it appear light grey, and saved the whole thing as a 'png' file which could then be printed on to a card like this:


Next I added a little quilling, using some more of my new metallic-edged strips ... and here's the end result:


I've tried just to create a 'suggestion' of the underlying pattern with my quilled shapes, utilising colours that echo the green, red, orange and gold of autumn leaves. I wonder whether William Morris would have approved?

Monday 26 September 2011

A shiny new quilled card design

Well, now that I've come back down to earth after all the excitement of last week, I've been getting back to my card-making once again. I decided, however, that it's time for a bit of a 'new look', so I've been experimenting with some speciality quilling strips and some different typography.

When I attended The Quilling Guild's AGM and Display of Work earlier this month, I was fascinated to browse through the  merchandise on offer from the various traders who were there. One of the items I bought was a pack of gorgeous 'holofoil' edged strips from JJ Quilling, and I've used them in this new twisted husking motif. As I hope you can see from this photograph, the yellow strips are edged in holographic silver, which catches the light in a fantastic way. The green strips I used are also edged with metallic green.

I chose colours for my quilling that would complement the dramatic daisy flower that I have used as the background for this card. I managed to 'extract' the flower from its background in Photoshop, and reproduce it in different sizes to make up the design. (I took the picture of this flower on my recent holiday in the Isles of Scilly, where the profusion of unusual blooms at this time of year really has to be seen to be believed!) The typeface I've used for the greeting is Zapfino, and I quite like the resulting handwritten effect.


Thursday 22 September 2011

My second 'secret' quilling!

Here's the other quilling I had been keeping 'under wraps' until after this year's Quilling Guild display of work was over.

It's another little 'sculpture', this time featuring a lily pond with a tree and a base of blue coils which hopefully give the impression of rippling water - well, that was the intention, anyway!


I created this piece a couple of months ago during my active 'vortex coil period' (which regular followers of Quilliance will no doubt remember!!)  I had the idea for the water first, as vortex coils seem to be the perfect medium for this! Then I made the willow tree out of two wide brown iris folding strips joined together along the sides, which I folded and pressed to form a solid vortexed trunk. I decided to decorate it with a few tiny solid dark brown vortexes (?vortices) whose centres have been pushed out and glued into place - these are meant to suggest gnarls on the tree trunk. Then all it needed was a little extra decoration in terms of some ivy and a leafy section at the top. It's meant to be a 'pollarded' willow, by the way, which you often see close to streams and rivers in England. (Pollarding means that that tree has been cut down very low in order to encourage 'bushy' growth.) I spread glue over the vortex coils on the underside of the pond in order to create a solid base.

I entered this into the 'Freestanding Quilling' section of the competition, and here it is in the bottom left hand section of the competition table - now, I did start out by saying it was 'little' didn't I?!!


Anyway, no prizes here, but I did learn a lot about vortex coils in the process of making it - and I was actually quite pleased with my water lily flower:


Wednesday 21 September 2011

I've been keeping secrets from you ... but they can now be revealed!

When I first received my member's invitation to attend The Quilling Guild event this past weekend, I had to decide whether or not to enter any of the competition categories in the annual display of work. It didn't take me long to decide that I would! Having made that decision, however, I had to set about creating the quilled pieces for my entries - and, of course, I had to keep them closely under wraps!

Now that the competitions are over, I can reveal the pieces that I entered into some of the other categories, and will post pictures here on Quilliance over the next few days.

First up is my 'Quilling In A Frame', for which I decided to create a quilled version of my favourite butterfly - the Small Tortoiseshell. Now, instead of just drawing the outline of the wing markings and filling them in with quilled marquises, I took my inspiration from an ornamental flower-bed and decided to create my butterfly's wings from flowers. So I used fringed flowers and folded roses to create the patches of colour on the wings, just as garden designers in English parks create pictures using flowering plants!

Here it is, mounted up on top of the glass within an unusual frame:


And here you can see it with some of the other 'Quilling In A Frame' entries on the competition table:


As soon as I saw the superb quality of the other wonderful entries, I doubted that my butterfly would stand much chance in the voting process, and so it proved ... but I'm still very proud of it!!

Here's a close-up section of the quilled flower shapes that I used for the wings. Maybe this is an idea that others would like to try?


Tuesday 20 September 2011

Quilling with the experts

It's not often that you get the chance to quill alongside expert quillers like Jane Jenkins, Diane Boden Crane and Elizabeth Moad - but that's exactly what we got to do on the brilliant Shared Skills Day that was organised by The Quilling Guild last weekend.

And just LOOK at some of the projects they showed us!!

It was a wonderfully informal event, staged in a superbly well-equipped hall where we sat around tables in groups of five or six, sharing techniques and learning from one another. Every so often, the call would go out that someone was about to demonstrate a particular method of quilling, and we would all gather round to watch and learn.


I was asked to demonstrate making the 'twisted wheatears' that I used in my winning 'Spiral Starburst' design, and before I knew it everyone seemed to be grabbing their slotted needle tools to twist the loops of huskings that they had made. Believe me, that felt good!


I think the most wonderful thing about this event was that we all felt so connected as quillers at every level - beginners and experts alike. It's so comforting to know that even the most accomplished quillers sometimes lose control of their coils, drop tiny quillings and succumb to the temptation of rushing ahead with a project too soon before their glue is completely dry!

I laughed, I learned and was inspired! And I just can't wait to do it all again next year ...

Monday 19 September 2011

A wonderful weekend with The Quilling Guild

It isn't often that you'll find me lost for words ... but right now I have so much to tell you about that I hardly know where to begin!

This past weekend, I attended The Quilling Guild's annual general meeting, display of work and shared skills day in the beautiful county of Suffolk. What a wonderful couple of days!  I have made so many new friends, put 'faces to names' of people who I chat with on the internet, watched some inspirational demonstrations and seen such an extravaganza of brilliant quilling that it feels as though my head will burst!

In fact, there's so much to say that I've decided to spread it over several blog posts in the coming days, starting with the most exciting news of all: I actually won three prizes in the Guild competitions!

My 'Rainbow Snowflake' picture came third in the 'Never Placed' section, which is intended for newcomers to the Guild (I joined last year).

My little quilled sea-shore sculpture achieved first prize in the 'Quilling Plus' category, in which quilling paper may be complemented with other materials (mine incorporates real sea shells).

Best of all, however - and I can hardly believe I'm telling you this - I was awarded the Rose Bowl Award for my 'Spiral Starburst' quilling on a twisted easel. The Rose Bowl is awarded for innovative quilling, so I'm particularly proud of this one. To say that I feel honoured is an understatement!

I'll tell you more about the competition entries, the people and the demos just as soon as I can think straight once again. Meanwhile, please excuse me while I spend just a little more time floating about on Cloud Nine!

Tuesday 13 September 2011

Quilling a cross stitch pattern

I'm finally getting organised again after my holiday. The laundry is done, the housework is 'in progress' ... and I've re-stocked my box of quilled cards for the market which was getting seriously depleted before I went away. So, finally, I'm able to get down to some new quilling projects - one of which is something that I've never tried before.

I recently picked up a lovely book containing cross stitch patterns. Now, I have absolutely no affinity with needles and threads whatsoever, but it did occur to me that some of the patterns in the book could easily be translated into some interesting quilling.

Cross stitch patterns are presented as squares of colour on a graph paper grid. So what I've done is scanned a sheet of this squared paper, imported it into my computer and then printed a section of it on to the front of a card. I did not want the grid to appear too prominent, so I used my graphics software to pull it into an oval shape with softly 'feathered' edges, printing it at low opacity so that it does not appear too dark. I think the end result actually makes quite an attractive background for some brightly coloured coils.

Anyway, I've only got part way with this flower pattern so far, but at least you can see where it's going! I've been working with tiny open coils made from 2cm lengths of 1.5mm quilling strips, placing each coil on to a little drop of glue inside each square on the grid. It's just a question of following the pattern to see which squares have to be filled and which colours to use.

My flower is taking shape, as you can see here, and I'll post a picture of the end result as soon as I have finished. There are loads of wonderful cross stitch patterns available, so I think this method of quilling could have some interesting potential. Watch this space ...


Friday 9 September 2011

Home from the islands ... with a taste of the sea

I can hardly believe it's been over two weeks since my last post ... but I have an excellent excuse! I've been on a wonderful holiday with my husband and two friends to the Isles of Scilly which, for me, represent a little piece of paradise just off the Atlantic coast of Cornwall (south west England).

Whenever I go there, I am inspired by the intense blueness of the sea and sky, the whiteness of the spectacular sandy beaches (strewn with beautiful shells) and the vibrant colours of exotic, sub-tropical plants that thrive in the islands' mild climate.

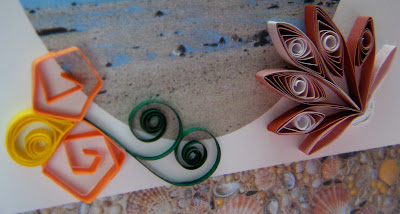
Of course, I took loads of photographs which will eventually find their way on to cards - and here's the first design that I've had time to work on since arriving home:


The main photo is a view of an elegant yacht moored off the island of Bryher, and below it is a section taken from a wall of the fabulous seashell mosaic 'house' which stands in the Abbey Gardens on Tresco.

I thought these images would make a perfect background for some 'beach life' quilling: some angular rocky coils, a yellow periwinkle shell, some narrow strands of seaweed ... and my attempt at a scallop shell, made using graduated strips. (You can see the real thing in the mosaic photo.)

I had a wonderful break, but now I'm really glad to get back to my quilling. My head is just bursting with new ideas, which I hope to share here in the weeks ahead.


LinkWithin

Related Posts with Thumbnails