Monday, 23 July 2012

Quilling at The Vyne

Well, I'm finally back at my computer after a wonderful weekend of quilling!

Yesterday, I attended a meeting of the Quilling Guild committee where we discussed exciting plans for the forthcoming Quilling Displays and Shared Skills Day at Lutterworth (Leicestershire, UK) on 15th/16th September 2012 - and also for what promises to be an unmissable celebration of international quilling to be staged in the UK in 2013 ... watch this space for details!

Meanwhile, on Saturday, I had the great pleasure of staging a quilling demonstration/'make and take' workshop at a magnificent 500-year old Tudor mansion in Hampshire called The Vyne, as a guest of The National Trust.

There was a special event being staged at The Vyne on that day, celebrating the mansion's historic connections with the English Regency period author, Jane Austen, who mentions the art of quilling in her famous novel, Sense and Sensibility.

In late 18th century/early 19th century England, quilling was highly regarded alongside needlework as a respectable artistic 'accomplishment' for young ladies. Paper filigree work was often used to decorate items such as tea caddies, fire screens, cabinets and picture frames, with several wonderful examples surviving to this day in various historic houses and museums.

I decided to follow the Jane Austen theme by creating a pattern of quilled shapes that could be used to decorate a picture frame containing her portrait. I purchased a suitable cardboard mount for the picture, and showed visitors how quilling could be used to form an intricate filigree pattern around the frame, offering them the opportunity to roll a few coils for themselves.

I also devised a 'make and take' project for a simple quilled greetings card, which proved very popular amongst junior visitors.

When I arrived at The Vyne on Saturday morning, I found myself surrounded by people dressed up in elegant Regency costume - it felt just like arriving on the film set of Pride and Prejudice!  Many of the visitors to the house came dressed for the Jane Austen era, and a group of Regency dancers from Hampshire delighted visitors with music and dance formations of the time.

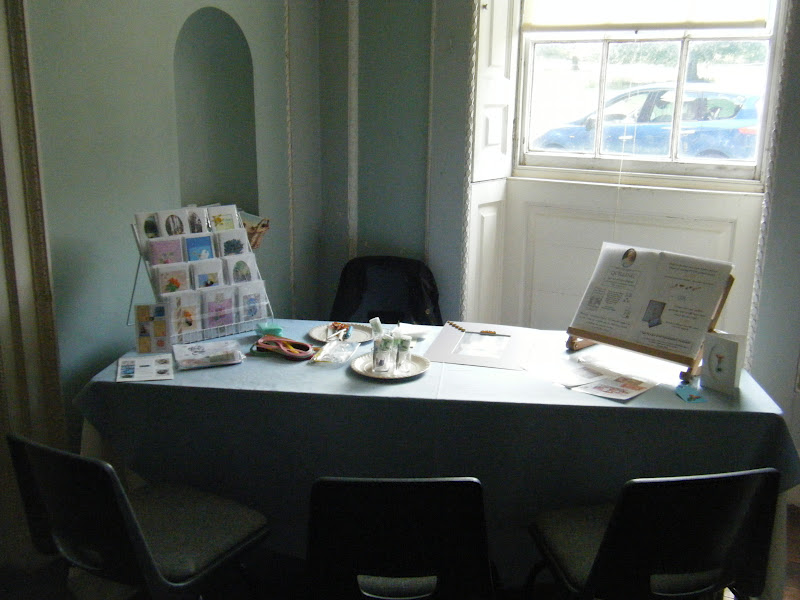
I was honoured to be allocated space for my table in the magnificent Staircase Hall at The Vyne:

Here's my table, complete with card display and demonstration showcards:


Here you can see the pattern that I had started for the frame at the beginning of the day, adding quilled pieces as the hours went by:

And here are two of my delightful 'make and take' customers who made such a success of their quilled cards:
Lauren Rigby from Farringdon

Julia Macdonald from Burghfield Common

I enjoyed the day immensely, and the whole experience has reaffirmed the enormous pleasure I get from teaching quilling - especially when my pupils are such stars!

Thank you, Jane Austen and everyone at The Vyne!!


Thursday, 12 July 2012

Still experimenting ...

There's a LOT going on in my life at the moment ... and none of it relating to craft!! However, I have managed to sneak in just a few moments of quilling over the past week - and here's my latest card: another experimental design on a 'textured' digital background.

The quilled central section comprises a bunch of tiny little curls, which I have glued down on their sides. I bordered it with some gently overlapping curves that I created by making some 'S' coils and snipping the coils away from each end. Then I used the snipped-off coils to form an outer border for the quilling. There is a digital 'drop shadow' effect under the central square to create the illusion of depth.

The multi-coloured digital pattern is actually based on a photo I took of a colourful flower bed during my visit to Devon a couple of weeks ago.  I put it through one of the amazing filters in Photoshop, and this was the result! Isn't Nature wonderful? And so is Photoshop!!


Tuesday, 3 July 2012

Back home to the backgrounds ...

First of all, I want to apologise to those of you who so kindly commented on my last post and never got a reply from me. I've actually been away for the last few days, walking and relaxing in the beautiful area of  Dartmoor in south-west England ... and while I was there, I managed to delete several of the e-mailed comment notifications on my BlackBerry by mistake! So, I'd now like to say a belated "thank you" to all who were so complimentary about my recent quillings on digital backgrounds ... and show you a few more that I managed to finish just before departing on my break.

As you can probably tell, my brain is now working overtime on all the creative possibilities of Photoshop! My head is just brimming with thoughts about colour combinations and textures, and I've already got quite a number of new card designs that I've printed but haven't yet had time to quill. As the rain continues to pour down on our miserable English summer, however, I hope to be able to catch up with myself again very soon.

Here are two versions of the same background design which I've managed to turn into two very different cards:


And here's another in which I managed to use the 'gradient fill' feature in Photoshop to create a somewhat bolder background ... I suspect this card design might be more suitable for a man:

It will be interesting to see how these new cards go down with customers at the market on Friday.

Now, I really must try and break free from the computer to go and quill some more...


Tuesday, 26 June 2012

On a roll with Photoshop

I really am on such a roll with Photoshop at the moment ... my library of new background patterns for quilling is growing by the day!

Last week I found another wonderful copyright-free image on The Graphics Fairy site, which has taken me from this:

To this (the textured background 'paper' I created using Photoshop):

To this (a birthday card featuring some quilling in complementary colours):

Meanwhile, my craft table is filling up with cards that I've printed with various other new backgrounds on, just waiting to be quilled!  I'm really loving this new approach to card design ...


Tuesday, 19 June 2012

Another patterned background for some quilling


This card features another patterned 'background paper' that I have created in Photoshop ready for printing. The elements that I used to create it come from a digital scrapbooking kit called 'Spring Forward' by Lonetta Avelar of Creative Victorian Designs, which was made available to readers of the excellent Papers and Pixels e-zine a couple of years ago.

I particularly liked the base paper that Lonetta had used in her kit, because it is slightly crumpled with a drop shadow alongside it, creating a very convincing illusion of 'real' paper when it is printed! Using Photoshop, I added some of the leaf and floral elements contained in the kit, positioning them in a semi-random way to create my background pattern.

Here's the finished 'paper' that I created:

The card design also utilises one of Lonetta's lacey borders in a complementary colour, which I have positioned 'over' the main background square.

And the quilling? I have tried to create a sprig of variegated leaves by filling up some open teardrop shapes with 'beehive' twists in two different shades of green. Then, for some reason, I decided to embellish the leaves with a crazy pink tendril ... what does that tell you about the jungle of my mind?

Monday, 18 June 2012

Backgrounds to the fore!


Lately, it's struck me how fabulous quilling can look when set against a background of patterned papers. Until now, my card designs have mainly utilised photographs or simple digital graphics as backgrounds for quilled motifs, so I thought it was time I started experimenting with more elaborate patterns. Instead of purchasing a pack of patterned papers from the craft shop, however, I decided to try and create a few of my own digitally using Photoshop so that the designs could be printed directly on to card.


Here's the first one I came up with ... starting with a basic 'textured paper' image, I simply added an array of flower and leaf images from Photoshop's impressive range of 'brushes':

Then I made a plainer one to complement the first, using another little shape from the Photoshop brush 'library'.

Put them together, and here's what you get:

The design at the top of this post utilises another combination of the same two 'papers', manipulated digitally in Apple's Pages software to create different backgrounds for quilling.

I think these papers bring a much softer touch to my card designs.  There's plenty of potential here!


Wednesday, 13 June 2012

Quilling with parallel huskings

In yesterday's post, I talked about the medallion graphics I discovered on the excellent Graphics Fairy site, and how I've been working on some card designs combining them with quilling.

Well here's my latest card, in which I have attempted to replicate a section of one of the medallion patterns using paper strips ... and which has led me to try and push the boundaries of the husking technique just a little bit:

 This is the section of pattern in the uppermost medallion that I wanted to partially replicate:

While studying it, I realised that I would not be able to reproduce the ribbed 'fan' section using the traditional method of alternate side looping, because the ribs lie in parallel to one another rather than all linking back to a shared central point.


So I decided to create each rib separately using a single loop around a pair of needles, using a tiny spot of glue to close it at the base. Having completed the first rib, I re-inserted the needles right next to it for the next one (following the curve of the pattern) and created a new loop which is attached to the first with just a little trace of glue along the side. Each subsequent rib was then created and attached separately in this way.

Each rib has a tiny loop at the bottom where my strip was secured to the base needle, and I think this creates quite an attractive pattern in the finished motif. What do you think?


LinkWithin

Related Posts with Thumbnails