Thursday, 29 December 2011

My top ten projects of 2011


It's always fun to look back over past achievements, and fellow blogger Regina Ribeiro has suggested that we all take time out to select our favourite ten projects of the past twelve months. I was actually quite surprised by the number of posts I have managed to make in 2011, but it didn't take me long to select the following for my own 'top ten':


My decorative card featuring a water lily and other quilled flowers, which won a prize at our local village show.

My quilled pin brooch that was selected to represent Hampshire in this year's Women's Institute craft competition.

Another pin brooch created using tri-coloured 'twisted' P coils and metallic edged strips.

Digitally quilled shapes providing a 'ghostly' backdrop  for 'real' quilling.

'It's a shore thing' - my sculpture combining quilling with photography,  real sea shells and vortex coil 'rocks' - won first prize in the 'Quilling Plus' category of the Quilling Guild's Display of Work for 2011.

My spiral starburst on a twisted easel features 'twisted' wheatears and vortex coil blocks, and was awarded The Rose Bowl for innovation at the Quilling Guild's Display of Work for 2011 ... my proudest achievement ever!!

'Rainbow snowflake' - inspired by a piece that was originally created in glass.

My small tortoiseshell butterfly was inspired by an ornamental  flower bed, and is  made from folded roses and fringed flowers.

My own modern 'take' on the Victorian techniques of Mosaicon (a quilling kit sold in England in the 19th Century).

Twists and more twists using the 'beehive' technique.
I would like to thank all my wonderful online friends who have inspired me and left such encouraging comments here on Quilliance over the past twelve months. You really have helped me more than words can say. It's great to be part of such a vibrant and creative international quilling community, which has enriched my life beyond measure - and I'd like to wish every one of you a happy and healthy new year.

Wednesday, 21 December 2011

A kavalcade of Ks!

I haven't got around to entering many challenges lately, so I decided to have a go at the one Pritesh has recently posted on her Quilling Me Softly blog, which is to create a quilled letter 'K".

The trouble is, once I started thinking about possible shapes and styles for the letter K, I couldn't stop! And after producing five very different quilled letters, I found it impossible to choose between them. So I put them all together to form a border decoration, which I can really only describe as a 'kavalcade of Ks'!!


I've decided that 'K' is a shape with lots of potential for borders, as all the letters connect easily with each other and seem to be marching forwards. I hope I won't be disqualified from the challenge for making more than one letter! But, even if I am, it really doesn't matter because my Ks were all such fun to quill!


Monday, 19 December 2011

Life goes on ...

Well, it may be Christmas, but life - and birthdays - still go on exactly as before! I always like to carry a stock of quilled 'age' birthday cards, because customers at our market do occasionally ask for them. I've got designs for ages one through five, 18, 21, 30, 40, 50 etc right up to 100 - these seem to be the main 'milestone' birthdays that people generally want to buy for. Inevitably, I do sometimes get requests along the lines of "Have you got a card for a 42nd birthday - and I need it today?", which, sadly, have to receive a negative response. (If only they had thought to ask me a few days earlier, I could easily have made up a card specially.) Generally, though, I find it's cards for the 'milestone' birthdays that are mostly in demand.

At last Friday's market, I sold the '2nd birthday' card that I'd had in stock for quite some time. Instead of re-making the same design, I decided to try something new - and here's the end result:


It's been a while since I've played around with the blocks of solid colour that I can generate for printing using my Apple Mac Pages software, and it's actually been fun for me to return to them today. I think vibrant blocks of colour can make wonderful backgrounds for quilling. For this card, I've used orange, purple and yellow to create a bright background (carefully avoiding pink or blue as this really needs to work as a 'unisex' design!!) I created some simple gold 'twists' to emphasise the corners of the central '2' using my slotted tool, and then added two quilled balloons and a couple of lime green vortex coils to complete the card.

Hopefully this will be seen as a fun design that might appeal to a young child ... and I'm already thinking about another version with some quilled birthday candles.

Tuesday, 13 December 2011

Doing it digitally

Well, I really seem to have gone from one extreme to the other over the past couple of weeks - from 19th century Mosaicon-style quilling to 21st century digital art (with just a little detour by way of 'beehive' coils in between!)

This week, I felt in the mood to start dabbling with Photoshop again, using the 'virtual' quilling shapes that I developed earlier in the year for my Coils By Quilliance page. When I first created the shapes (in conjunction with an article I was writing for Papers and Pixels magazine), I experimented with using them to create various 'digitally quilled' backgrounds for traditional quilling, which certainly generated some interesting shadowing effects.  I've decided, however, that maybe it's time to start bringing this particular technique a little bit further 'out of the shadows', and explore the potential of digital quilling in its own right.

So, today I created this digitally quilled motif:

Which has found its way on to a new card design here:

I've also played around with creating these designs, which were fun to develop using the various resizing and colouring facilities that you get in Photoshop:


Digitally quilled images like this are certainly easy to reproduce in bulk - all you have to do is print them out!

Clearly, this digital approach will never be able to compete with the depth, texture and sheer versatility of real quilling - but I am beginning to wonder whether digital methods might eventually find a place alongside traditional techniques as our art continues to evolve.

Friday, 9 December 2011

Some more beehive quilling: doing the double!


As I predicted yesterday, 'beehive quilling' is really taking off ... and I couldn't resist having another go myself, with - as you'd expect! - a few Quilliance-style twists thrown in!!

First I made two teardrop shaped open rings and set about filling them with beehive swirls. As you'll see, the swirls are multi-coloured - that's because I worked with long strips made up of several different colours joined together. Once I had packed out the teardrops with my swirls, there were a few gaps that I wanted to fill. So, in each case, I picked a short length of strip to match/complement the adjacent swirl colour, and did some more twisting to make an infill piece - the result is swirls within swirls, or maybe even a double-beehive effect!


I've mounted my teardrops together on a card as you can see here, with a printed blue background panel and two scallop-shaped cut-outs to which the quilling is glued. Two simple 'P' coils join it all together. Fun!!


Thursday, 8 December 2011

A buzz about the beehive!

Thanks to the internet, it doesn't take long for word to spread about new quilling techniques ... and this week the spotlight has been firmly focused on Susan's 'beehive' method for filling in quilled shapes. If you follow this link to her blog, you'll find photos of some brilliant jewellery she has made, plus a link to a very helpful video tutorial that's been recently produced by Pritesh.

The 'beehive method' seems to take the 'scribble technique' a stage further through the creation of a series of closely positioned swirls right along the length of a quilling strip using a slotted tool. The resulting swirls can then be bundled loosely together and dropped into a shaped open ring coil where they then open out to fill it up completely.

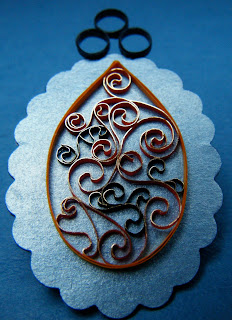
I thought I'd have a try at 'the beehive' by creating this new pendant.  However, instead of tightly packing my teardrop-shaped outer ring with swirls, I decided to try leaving a little bit of space around them for the background to show through.

For this piece, I've used a combination of orange and black 1.5mm metallic-edged strips mounted on to a double-ply punched cardstock base that's been topped with pearlised gift wrap. (The strips actually started out as 3mm ones which I cut in half by hand.) I quite like the gilded effect that the strips produce, and I'm pleased with the way the colours work together to create contrasting areas of swirls.

I'm sure that tightly packed swirls also have great potential for use in flower petals, butterfly wings etc, and I've no doubt that many quillers across the world are working on similar projects right now. In fact, I think we'll be hearing a buzz about 'the beehive' for quite some time to come!!


Monday, 5 December 2011

Something quilled and bright for Christmas

I came across an interesting idea on The Quilling Guild's Facebook page last week. Jane Jenkins (yes, THE Jane Jenkins who has published so many inspiring quilling books!) posted some examples of alternate side looped huskings she had made. However, instead of gluing the loops in place, she left them loose and dropped each husking into a ring coil where the loops could release themselves 'at will', resulting in some attractive 'chevron' patterns.

I thought I'd give this a try, but also decided to encourage my husking to unfurl a bit more randomly (following the 'quilled scribble' principle). Then I decorated the end result by putting a few quilled shapes in contrasting colours between the folds.

The result is a crazy Christmas card design which I'm quite sure no-one will ever want to buy, but I enjoyed the process of making it (which is probably all that matters!) I've matted my husking on to a scallop-shaped cut out, then mounted the whole thing on to a printed background. The 'greenery' sprig at the top right was digitally quilled for printing.

Well, at least it brightens up a grey December day ...


Saturday, 3 December 2011

Another new quilled pendant

I'm really getting into the swing of making these pendants on a shaped background ... this one's very different from the others because I've used a black background shape, but I think it looks quite 'dressy' with the silver and gold quilling strips that I used for the motif. Now that I've put the varnish on, it's very shiny too!


I've also been busy making this pendant:

and these leaf-shaped earrings:

I've sold the earrings, but there have been no takers for the pendants yet! Still, there's always next week's market ...

Monday, 28 November 2011

A new start ... and some finishes

When I first started blogging, I felt nervous to say the least. What was I getting into? Who would read my blog? Those same feelings resurfaced when I first joined Facebook, a year or so ago. However, "fortune favours the brave" as they say, and the journeys I have taken into the on-line quilling world have enriched my life beyond measure. So ... encouraged by the very positive response that my blog and Facebook pages have already received, I've decided to take another step forward and sign myself up for Twitter.

Over the weekend, I've been thinking about exactly how I'm going to make use of my new Twitter account. Obviously, I shall be 'tweeting' from time to time about what I personally am doing quilling-wise (for those of you who are interested!!) - but I've also decided to use my Twitter feed to report and re-tweet items of news that I read/hear about in the international quilling community as a whole. By 'news', I mean exhibitions, awards, challenges, new techniques, details of new books and articles about quilling, and perhaps even links to interesting tutorials. What it WON'T be is a general showcase for individual quilling projects, as we already have our own blogs and Facebook groups for that particular purpose. I'm hoping that compiling this 'feed' will prove to be a useful resource for me in my role on the editorial team of Quill America (the quarterly magazine of the North American Quilling Guild), when researching material for possible future articles. Plus, I'm also hoping that quillers worldwide will find it useful to have a source of quilling news all in one place, rather than having to search for news items amongst all the individual projects posted on a typical Facebook group page.

So, if you're already on Twitter (or even just thinking about joining), I'd like to invite you to become a follower of my new feed @quilliance

Once I have acquired a reasonable number of followers, I'll start posting news items in earnest ... and then we can all find out exactly where this idea is going to lead!

And now for the finishes ...
Meanwhile, I promised to post a few details about the protective finishes I use for quilling at the request of my loyal blog follower, Sathya. I often get asked about this, so hopefully the information that follows may be of interest to other quillers, too.

The way I see it, if you are going to preserve quilled pieces (especially jewellery), you first have to make them strong, and then add something to make them waterproof. For strengthening purposes, I always like to coat the outside edges of quilled items such as pendants, brooches and earrings with PVA (poly vinyl acetate) glue (the same adhesive that I use to join coils with). I use a small paint brush to apply the PVA, paying particular attention to reinforcing crucial joins (for example, the area where the hanging ring attaches on to an earring as in the photo above). I also like to apply PVA to the backgrounds on which my quillings are mounted (like the silver heart-shape in my photo). Once the PVA is dry, the areas that have been coated become shiny and quite hard - in fact, they feel almost plasticised. BUT, if the piece gets accidentally splashed with water - which could easily happen if a piece of quilled jewellery is worn outside on a rainy day - the PVA will temporarily turn white and sticky. So you also need to add an extra waterproof coating in the form of lacquer or varnish.

Until recently, I always sprayed my finished pieces with a clear lacquer (like the one shown on the left of this photo) to provide this protective coating. People tend not to believe that jewellery made from paper strips could possibly withstand a shower of rain, but I have even tested my PVA'd and lacquered earrings under a running tap and the water just runs off them, with no damage done to the quilling whatsoever! The trouble with spray lacquers, though, is that you have to wear a mask when spraying, and you need to find a way of securing the quillings while you are doing it, as the force of the spray can easily blow them away! Spray lacquer can also play havoc with the appearance of some metallic-edged strips by taking away their shine. So, really, this approach is all a bit of a hassle, particularly as spraying is a job that's best done in a well-ventilated place or outdoors.

Because of this, I've also been experimenting with applying clear nail varnish to my quilled pieces, and it seems to work very well. The varnish is easy to apply on top of the dried PVA coating using the integral brush, and it dries within a couple of hours to leave a very presentable glossy finish. I think the varnish also helps to further strengthen the finished piece.

If you are wanting to preserve a larger piece of quilling, such as a picture to go in a frame, I think spraying it with lacquer would still be the way to go in order to ensure coverage of all the intricate little 'nooks and crannies' in it. But I would definitely recommend nail varnish for small items of jewellery. What do other quillers think?

Don't forget to check out @quilliance on Twitter! I look forward to 'seeing' you there!

Saturday, 26 November 2011

Two more pieces of 'modern Mosaicon'

If you liked the quilled pendant I featured in my previous post, I hope you will also be interested in these:

I created both pieces using documented 19th century quilling techniques with a bit of a 21st century twist - I think I'm going to have to call this 'modern Mosaicon' in tribute to William Bemrose's original 'Mosaicon' kit which was sold in the UK in Victorian times.

These are the principles I used:
- Open ring coils pressed into different shapes (some with smaller shapes inside)
- Metallic backgrounds, topped with various colours including black, green and violet
- 1.5mm strips (3mm cut in half) for maximum delicacy
- Inclusion of gold, silver and metallic edged strips in the design
- Use of solid coils made from crimped strips.

My method for making the pendant background discs is also described in my previous post.

Now, is anyone else ready to give this 'modern Mosaicon' a try?

Thursday, 24 November 2011

Mosaicon 21st century style

"A gold centre surrounded by green, violet and other colours cannot fail to look pretty. Crimped papers lend themselves admirably to this treatment."
From an article on 'Floral Mosaicon' published in 'Every Woman's Encyclopaedia', circa 1911

In my last post, I talked about Mosaicon - the quilling kit that was commercially produced in the UK for filigree artists back in Victorian times. These past few days, I've been fascinated by an article about Mosaicon which appeared in an encyclopaedia for women 100 years ago - and it's inspired me to put some more of its suggestions to the test.

Mosaicon work seems to have been characterised by the use of shapes created using ring coils, enhanced by huskings and open coil filigree work. The 'Floral Mosaicon' article also contains several points of guidance concerning the use of colour, and, as you will have seen, I've quoted from one of these at the top of this post.

"A gold centre surrounded by green and violet" ... well, that made a great starting point for a modern-day 'Mosaicon' design which I decided to create for a pendant. Taking on board the advice about crimping, too, I rolled a tight coil from a crimped gold quilling strip, then bordered it with another crimped strip in green.

(For this project, I also decided to work in 1.5mm strips for extra delicacy, so I cut my selected 3mm strips in half.)

Next came the violet ... the green ring is bordered by a series of heart shapes, fashioned out of open ring coils. Then I added some 'S' scrolls in deeper purple - so far, so good!

At this stage, however, the central gold circle was still completely plain, and as I had used quite a deep matt gold colour to create it, the centre of my design looked a little dull. Just as I was wondering about how to 'lift' it, I received a comment on my last blog post from Ann Martin.  "... another look I like is gold on gold which gives a sense of metalwork", she said. Eureka! I would add an extra embellishment using some black strips I have which are edged with a much brighter gold - and the end result really does look like metal! Thank you for the inspiration, Ann.

Having completed my quilled motif, I decided to mount it on a circular background comprising two pieces of card topped front and back with gold gift wrap paper, as described in my last post about the brooch. I added a ring coil to the top edge (for attaching a jump ring) and coated the whole pendant liberally in PVA glue to give it maximum strength and stiffness.

Normally I spray my quilled jewellery pieces with clear lacquer, but this time I thought I would experiment by coating my pendant on both sides with clear nail varnish. This proved to be quick and easy to do, and it has resulted in a deep glossy finish which really brings out the metallics in the piece.

I'm pleased with the way this pendant has turned out, and have decided to keep it for myself rather than offering it for sale at the market. My customers won't be missing out, however, because I'm already part way through making another similar one with a different design on it. And my mind's working overtime - just think what sort of effects could be created with holographic-edged strips?! Watch this space ...


Tuesday, 22 November 2011

A time-honoured approach to modern quilling

In the late 19th century, English 'ladies of leisure' could purchase quilling supplies in the form of a commercially-produced kit called 'Mosaicon'.  The techniques they used to decorate boxes, frames and menu cards were first described in a book published by William Bemrose in 1882, which undoubtedly laid the foundations for the practice of modern quilling.

I have yet to see a copy of Bemrose's book, but I have been able to obtain a transcript of an article entitled 'Floral Mosaicon' which appeared in 'Every Woman's Encyclopaedia' sometime between 1910 and 1912. In it, many applications and methods for quilling are described - and I believe they have as much relevance today as they did for filigree artists in the early 20th century.

As I mentioned in my last blog post, Mosaicon favoured the use of ring coils in preference to closed loose coils, but these were pressed into all the familiar shapes we know today: teardrops, eye shapes, leaves, hearts etc etc. Open scrolls were widely utilised, and huskings too. In fact, practitioners of Mosaicon used a wide variety of techniques to produce absolute masterpieces of floral filigree.

I've decided to go back through time and revisit some of the quilling methods described in the 'Floral Mosaicon' article, as I'm sure that many of them are just as relevant today as they were 100 years ago.

Here's the first piece of advice that I picked up:

"When the groundwork employed is in gold, flowers, leaves and stalks should be made in colours, and vice versa; when the groundwork is plain, flowers, etc., should be made either in gold or colours."

Groundwork in gold ... well, that sounded attractive! I've got some beautiful gold gift wrap paper in my stock, so I punched a piece out in a scallop shape and glued it on to a matching cut-out base of card. (Actually, I made the base by punching out two matching scallop shapes from ordinary card stock and gluing them together. By the time the gold paper was glued on to the front, the resulting base was quite rigid - plenty strong enough to affix a pin and make this creation into a brooch.)

After coating the gold paper with a layer of PVA glue to make it shiny, I added some simple quilling with petals for the flower-head fashioned in the time-honoured manner using ring coils.

I brushed PVA around the edges of the quilling, and then sprayed the whole thing with clear lacquer to ensure that my brooch would be waterproof. Here's the end result:


While making this, I felt very 'connected' to earlier generations of quillers who expressed their creativity through the techniques of Mosaicon.

Reading through the 'Floral Mosaicon' article, I came across one particular paragraph which so closely echoes my own philosophy of quilling that I might almost have written it myself: "... anyone of an artistic temperament can think out new designs. Indeed, the work itself constantly suggests new ideas." I couldn't agree more! So let's all celebrate our amazing quilling heritage!

Thursday, 17 November 2011

Back to reality!

Well, enough of all these 'scribbles' - although they certainly do seem to have got everyone's imagination working overtime ... and I'm happy about the favourable comments they have received.

Digital background courtesy of Laura Boetto at Papers and Pixels
Now it's back to reality for me with a more conventional design. This card was made for my daughter-in-law's birthday earlier in the week, and I'm glad to say she was very pleased with it. I made the flower petals using ring coils which were pressed into a teardrop shape and then embellished with contrasting S coils inside.

Apparently, open rings were very popular in Victorian times among English quillers who practised their art using a commercial kit called 'Mosaicon'. Many of the basic shapes we know today were created from open rings and then decorated inside as I've done here. I formed my rings by winding strips around the circular shaft of a rubber stamp. It makes a change from the familiar closed loose coils that we use so often these days, and I like the potential for embellishing the inside space. I'm sure that modern quillers could draw a lot of inspiration from these old techniques. Meanwhile, of course, I couldn't resist adding a 21st century element by placing my quilling on a printed digital background!

Monday, 14 November 2011

A new 'scribble' for Christmas

Well, my last quilled 'scribble' really wasn't intended to be a flying baby elephant, but so many of you saw the same image in it that I can now no longer look at it in any other way!!

These 'scribbled' images are proving to be rather fun, and it's very interesting to hear the different interpretations that people put on an abstract shape - a bit like those psychological 'ink blot' tests where you are asked to describe what images you see in random blobs or splashes of paint!


Anyway, encouraged by the very positive comments I've been receiving about these, here's another quilled 'scribble' design which I thought would make an unusual card for Christmas. You can't see the colours very clearly in this shot, but the darker strip is actually a deep metallic green. Obviously there's a suggestion of holly berries, greenery and maybe even a candle flame ... but I can't wait to find out just what other people see in it!


Sunday, 13 November 2011

Another quilled 'scribble'!


I sold this card almost as soon as I had made it ... and so I very nearly forgot to post it to my blog!  It's actually just another of those random quilled 'scribbles' that are made by coiling the first few centimetres of a strip, then inserting a slotted tool at various intervals along its length to create a succession of twists and turns. (There's another example in my previous post.) When you let the twisted strip relax, it settles into an interesting abstract shape which can then be secured by gluing down the end just as you would do with a conventional closed coil. I used two contrasting strips to make this 'scribble', and decided that it would look OK on a plain background of matted squares. Well, at least one other person must share my 'off the wall' tastes, because it quickly found a buyer at our Friday market.

I'm sure most quillers would agree that paper strips sometimes seem to have minds of their own - and I guess this proves that interesting effects can sometimes be created as a result of 'happy accidents'! Or maybe it just appeals to me because I prefer to quill straight from my head (or twisted mind?) rather than following a pattern. One thing's for sure - it's a unique design and will definitely stay that way, as I couldn't even produce it again myself!!


Monday, 7 November 2011

Some more embossing ...

Now that the excitement of the blog hop is over, I'm getting back to making some new cards. Thanks to everyone who kindly commented on my 'Sweet leaves of autumn' post - I hope I have managed to reply to them all, except the ones whose e-mail addresses are not made public on Blogger. So a special thank you goes to those friends as well!

I've been enjoying playing with my new Cuttlebug machine, and have managed to create some new embossed backgrounds for my quilling.

For this card, I first used my 'swirly' embossing folder to make a central patterned section on the front, and then added a square mat of purple mulberry paper which I have also embossed. The mulberry paper is mounted on top of a blue paper mat. I also added a heart shape stamped out of gold paper. The quilling is done in my favourite purple strips which are edged with gold.  I think it creates quite a regal feel!


The second card utilises a mat of gold paper which I first embossed before stamping out in a crimped oval shape. This has then been mounted on a printed background.  I created a 'random' piece of quilling using a gold strip which I coiled a little bit to start and then crimped/twisted at intervals down the length of the strip using a slotted tool. The resulting abstract shape assembled itself quite naturally into an interesting kind of 'scribble' which I have glued onto the card. Just don't ask me to try and make another one the same!!


Friday, 4 November 2011

The sweet leaves of autumn

What colours are the fallen leaves of autumn? Brown? Gold? Yellow? Look closely, and you will see all those colours and many more besides: deep red, orange, scarlet ... even silver. So here is my tribute to the multicoloured spectacle that's at its height right now in the Northern Hemisphere - and also my contribution to the Sweet Leaves Blog Hop which starts its journey around the world at Sandy Diaz's blogspot here.

My leaves have been created using a variety of quilling techniques: closed coils, open and 'S' coils, wheatears, huskings and anything else that came into my head! Some of the strips are crimped, some are double-wound with complementary colours, and for the teardrop-shaped leaf I used a strip that's graduated from green to white. Autumn leaves come in so many shapes, sizes, colours and textures that they seem to provide an endless source of inspiration. Who needs written-down patterns for quilling when Nature provides so many of her own?


And the background for my leaves? This was digitally quilled in Photoshop Elements using 'virtual' quilled shapes which I re-sized, rotated and coloured on-screen to create a leaf-like printable background image. If you'd like to know more about digital quilling, please click here.

And now - on with the Hop! You're currently visiting Philippa's blog, Quilliance, at the end of the European section. You can continue your journey by referring to the 'route map' here:


LinkWithin

Related Posts with Thumbnails